Showing posts with label Winter Cards. Show all posts

January 14, 2022

Snowflakes and Friends Winter Card

Hello and welcome!  This is Shanna from Caffeinated Craftiness here today with a fun and easy card project! January is full of chilly mornings and playdates in the snow....So I decided to pay tribute with this snowman card!

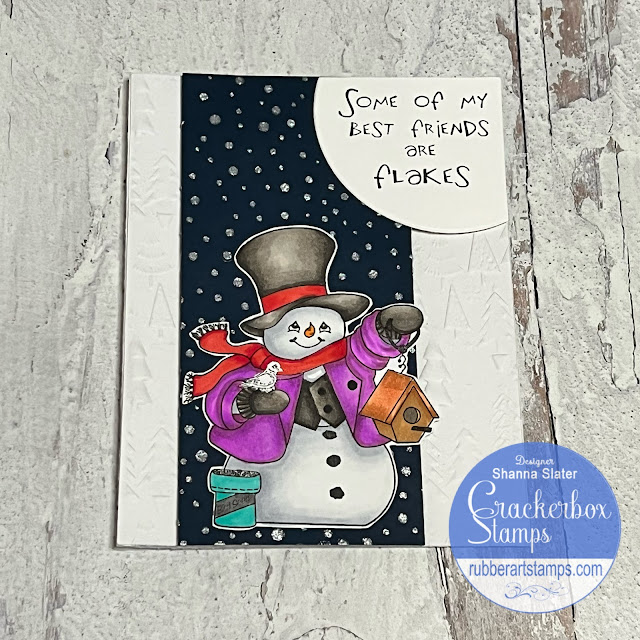
I grabbed the Snowman and Bird stamp that was released in December and had fun creating this simple a2 card!  I colored the image in with my Copic Markers and then fussy cut him out.  Next, I dry embossed a white card panel using a 3d tree embossing folder I had in my stash.  I adhered the white panel to an A2 card base.  To help ground the image some, I grabbed a scrap of navy cardstock and used a glitter paste and snow stencil to add some glitz and dimension.  I mounted the snowman onto the navy strip after it was dry and then glued it to the tree panel.

For my sentiment I die cut a circle, then stamped the sentiment, Friends are Flakes, off-center on the circle, so I could trip the top and side off to line up with the card!  

Are you all done with your winter crafting and starting on spring cards??  Or are you like me and doing a bit of both still?

Affiliate links are used at no cost to you. I receive a small commission if you choose to purchase, I appreciate your support! Here are the stamps used in today's project:

Cracker Box Stamps Friends are Flakes
Crackerbox Stamps Friends are Flakes
Shop at:
CS
Cracker Box Stamps Snowman and Bird
           Crackerbox Stamps Snowman and Bird
Shop at:
CS

You can find more inspiration, and share your own fabulous projects in the Crackerbox and Suzy Flaunt it if You Made it Facebook group! That wraps up my post for today, I will be back here soon with another dose of red rubber inspiration! Be sure to follow along with me over on Instagram and Facebook to keep up with all my caffeinated adventures! Till next time, bye!

December 20, 2021

Believe in Santa Christmas Card

Merry Christmas!
Vicky here and I know it's really close to Christmas and this will be my last Christmas card post.
This is a slimline card that was easy to make.


The die cut is from Tim Holtz set.
Stamps I used:

I hope you have a wonderful, healthy, and fun holiday!

December 15, 2021

Charlie Brown Christmas Tree Card

 Hello, Nadine here today! Can you believe it is almost Christmas? Today I am sharing is one of the many Christmas cards I have made this year. A Charlie Brown & Sentiment Christmas Tree card.

To create my card, I first stamped the Charlie Brown Tree Stamp on a white piece of cardstock and the Not What's Under The Tree Sentiment Stamp right under it. Then I colored the tree with some Copics which was not a lot of coloring and added a little sparkle to the ornament with a glitter pen.

Around the outside edge of the white cardstock piece, I used an ink blender brush to add some blue ink just around the edges leaving the center of the card white. Then I randomly stamped the Snowflake Stamps in different sizes around the outside edge using VersaMark and heat embossed them with white embossing powder. Then flicked on some of the glitter from the glitter pen.


For the full list of supplies used, click HERE.

December 8, 2021

Blowing Snowflake Winter Tree Card

Happy December! Ericka here and if you are like me, your are still making and sending out your Christmas cards. No matter how early I start, it seems like I can never make enough and get them all mailed out in time. Well, today I have an easy and quick Christmas card that you can make multiples of using different colors.


I started with Bristol Smooth paper and blended Distress Oxides in Squeezed Lemonade, Peacock Feathers, and Lucky Clover. I then used my spray bottle to spritz the background and lift off some of the ink. Once my panel was dry, I stamped the Blowing Snowflake Tree and Peace sentiment and heat embossed them in gold.


I love all the Blowing Tree images and the beautiful details each of them has for the different seasons.

 Thanks for stopping by and I hope you have a wonderful week. 
For a list of all supplies used, click HERE.

December 2, 2021

Winter Snarky Card by Martha Lucia

Hello friends, Martha Lucia here! It's December and today I have a winter stamped and snarky card. Well honestly winter it’s not yet but all of us are prepared to receive it.


First, I stamped the Chuck the Squirrel and the Winter Sucks Sentiment onto smooth white cardstock. Then on a separate piece of cardstock, I stamped the Acorns. I used the images included on the Chuck the Squirrel Set of 3. These images are also available individually.

I colored the Chuck the Squirrel with Illustrator Markers also from Spectrum Noir. The colors that I used were TN2, TN3, TN4, EB6, and FS6.


To continue with the card, I colored the Acorns with TriBlend Brush Marker from Spectrum Noir. The colors that I used were Yellow Green Blend and Alpine Green Blend, Additionally, I fussy cut them with scissors and left them aside for a while. With a stencil and Pumice Harmony Water Reactive Ink, I created the background around the colored images.

I hope you like my Winter Stamped Card. Remember that Crackerbox is offering FREE SHIPPING in all orders over $45 to US and over $65 to Canada.
And if you want to see all the colors of markers and special details about my card, you can find them HERE in my Stampartpapel Blog.
Happy Shopping!
Martha Lucia

November 26, 2021

Happiness & Joy Christmas Card

 Hello crafty friends! Tracy here, and today I have a sweet and festive little card to share. Here are all of the details.


Crackerbox Stamps Used:


Other Products Used:
Simple Stories- Holly Days Paper
Heartfelt Creations Dies
Archival Ink- Jet Black
Zig Clean Color Markers
Waterbrush
Cardstock- Red, White
Scrapbook Adhesives by 3L- Crafty Foam Tape, 3D Foam Squares, E-Z Runner Grand, Dual Tip Glue Pen

Stamp the snowman image onto white cardstock using black ink. Add color to the image using Zig Clean Color Markers and a water brush. Fussy cutout and set aside.

Die-cut the sentiment background layers from white and red cardstock using decorative dies. Stamp the sentiment onto the die-cut piece using black ink. Adhere the decorative border to the red cardstock layer using a glue pen. Add the sentiment piece to the other die-cut pieces using foam tape.

Add a simple patterned paper layer to the 4x6 cardstock card base. Add the sentiment piece to the right-hand side of the card. Add the fussy cut snowman using foam squares.

Thanks so much for stopping by!

November 18, 2021

Warm Winter Wishes Christmas Card

Hello crafty friends! Tracy here and today I have a fun little festive card to share. Here are all of the details.


Crackerbox Stamps Used:


Other Products Used:
Cardstock- White
Simple Stories- Simple Vintage North Pole (patterned paper, bit & pieces)
Zig Clean Color Markers
Waterbrush
Staz On Ink- Jet Black
Enamel Dot
Scrapbook Adhesives by 3L- 3D Foam Squares, E-Z Runner Grand

I took the red piece of cardstock that comes in the card kit and traced it onto the red snowflake patterned paper, then cut that down slightly. Adhere these layers together onto the card base. Add a strip of striped patterned paper along the bottom of the card.

Stamp the Warm Winter Wishes sentiment onto the ephemera piece using black ink. Then I added an enamel dot.


Stamp the Present image onto white cardstock using black ink, then add color to it using Zig Clean Color Markers and a water brush. Fussy cut out the image and then add to the top circle area of the card baser using foam squares.
Add the envelope and another piece of ephemera to the card front.

Thanks so much for stopping by!

November 10, 2021

Wishing You A Warm Winter on a Center Step Card

  Hello Crafters, Vicky here with one of our new stamps, Snowman & Bird.
It is a quick and fun stamp to color. I put it on Center Step Card.


The Snowflakes Sm. & Med. were stamped with white ink.
The saying is 2 stamps.
The snowballs are cotton balls cut up and rolled into small snowballs.
Thanks for stopping by!

November 1, 2021

Hot Chocolate Hugs and New Card Kits

Hi again! This is Shanna with Caffeinated Craftiness here with a project featuring a few of the amazing red rubber stamps from Crackerbox Stamps! Happy November too!  I am going to give you guys a peek at the brand new card kits being featured this month---and they are so cute!!

This month starts off with Holiday Cardmaking made easy with kits!  Card kit 17 and card kit 18 are both perfect for Christmas crafting.  Both kits feature a fun fold card that comes precut and scored and ready to go!  This month's fun fold is a bib card, with a festive red panel!

I used a few stamps from Kit 17 in my project today. Did you know you can also purchase the stamps individually if you wanted them without the rest of the kit??  The Hot Chocolate Hug saying sentiment is adorable and super versatile for winter crafts, and the Hot Chocolate mug is the perfect size for cards or tag making too!  The snowman featured in this kit is super adorable in its own right---and I will have a card soon with him as well ;)


My card was fun and easy to put together.  First I stamped the Hot chocolate mug directly onto the card base, centering in the middle of the circle.  I found it easiest to do this whit the card base closed.  I Copic colored the mug and then moved onto my bib panel.  I used red ink and stamped the mug all over the back so there was a tone-on-tone background.  I quickly heat set that so I could emboss my Hot Chocolate saying sentiment onto the front in white embossing powder.  By heat setting the panel first, I assured the red ink was completely dry.  To finish the card all I needed to do was adhere the red bib panel to the form of the pre-made card base!  EASY!

Have you started on your Christmas cards yet??  How many do you usually make??  I have a few more designs in my head left with these new kits---so stay tuned! 
Be sure to follow along with me over on Instagram and Facebook to keep up with all my caffeinated adventures! Till next time, bye!

January 29, 2021

Warm Wishes Cat Card

 Hi Everybody,

Cornelia here today. Some of the products I have used have been provided to me by various companies I design for. Affiliate links may be used in the links provided below.


 I am still playing with this adorable knit set from Crackerbox & Suzy Stamps that recently, but no longer (sorry) was on sale. I adored the cat with it. 


I colored the Cat with Sign and the Knit Set with water brush pens. Used some alphabet dies to create the sentiment. Trimmed my card on the side and added a strip of designer paper. 


Here is the set:


Here are the stamps I used:


I hope you liked this. there might be some knit sets left in the store.......
 Thanks for visiting!

January 26, 2021

If Kisses Were Snowflakes Love Card

Hello stamping friends! Tracy here, and today I have a pretty little winter inspired card today. With Valentine's Day coming up, why not celebrate LOVE. Here are all of the details.


Snowflakes Large                Snowflake Kisses

Other Products Used:

Distress Oxide Ink- Wilted Violet, Stormy Sky
Blending Tool
Stampin Up Ink- Night of Navy, Elegant Eggplant
MISTI
Stickles- Diamond
Cardstock- White
Gems
Scrapbook Adhesives by 3L- E-Z Runner Grand
Water Mister
Heat Gun


I started by creating a simple blended background using Stormy Sky and a blending tool. Next, I stamped the large snowflakes around the border of the card front using dark purple ink.

On a craft mat, stamp some Wilted Violet Distress Oxide ink onto the mat. Mist it with water. Then drag the edges of the card front through the inky water and dry with a heat gun.

Using the MISTI I added the sentiment in the middle of the card using navy ink.


Add the card front to the white cardstock, card base. Then I added some final sparkle with some gems in the middle of the larger snowflakes and Stickles in the middles of the smaller ones.


Thanks so much for stopping by!

January 25, 2021

Sweater Sale with Crackerbox & Suzy Stamps

 Hello Stamper!

Since we can not give hugs as easy as we use to, I made the sweater to let another person know you miss their hugs.

Great news! The sweater set is on sale for 50% OFF... last day of the sale is today!
The regular price is $10.75
Sale price is $5.35

I stamped the sweater twice and then cut the arms off on one of the images.
I glued the arms together and then the sweater cuffs together.
The background is a stencil.
The hats and mittens from the sweater set was stamped on the background.
The arms are off of the card and forms a HUG!

Stamps I used:

Other cards I made with the sweater!
You can see these cards on my blog:


January 22, 2021

Knit Sweater Stamp Set Card Ideas

We have a knit of a sale for you! Our Knit Sweater Stamp Set of 3 is 50% OFF starting today Jan. 22nd and running through Monday, Jan. 25th.
No code needed, discount will be applied to checkout.


Our design team has created several different cards as inspiration on how you can use these stamps. 


We would love to see how you used these stamps! Share your cards with us on our Facebook Crackerbox & Suzy Stamps Flaunt It If you Made It Page.