Showing posts with label Insect - Bug Cards. Show all posts

July 13, 2023

Caterpillar Dreams Card

Hi Everybody! Cornelia here today with my Crackerbox Stamps post for this week.

I first brushed the background. I then stamped the reeds and the caterpillars. I stamped the yellow/orange caterpillar again onto scrap paper and colored it with Copics. Cut it out and add it to the background. The other two caterpillars I colored directly, although I did stamp the eyes of the green one and cut those out as well. Added white paint accents. I used a square die to die-cut the panel and a slightly larger size for the black frame. Stamped the sentiment. Added the butterflies.

The stamps I used:
Caterpillars set of 3 
(on sale right now)
Tall Grass

And perhaps you want to check out those:
I hope you liked this. Thanks for visiting!
Happy Stamping!

July 1, 2023

Summer BBQ Invitation Card

Hello, Stampers! Vicky is here today. How about a fun invitation to a BBQ? And how about having these stamps at 50% OFF!

As you can tell, I just wrote the Come to the BBQ. I stamped the Bull; he is on sale for $2.88, and he is one on sale for 50% off. He is mounted on colored card stock that I put on a folded card.

This is the open card. The Hamburger is also on sale for $3.13 and looks very yummy!
On the inside of the card, where you can put all your information for the picnic, I stamped some more fun stamps on sale! I love these ants; they can carry so many things! Here are the Ants set of 3 carrying away some of the food; Pickle, Mustard, and Ketchup

Stamps Used:
Bull -$2.88
Hamburger -$3.13
Ants -9.10
Pickle -$1.83
Ketchup -$2.88
Mustard -$1.83

Thanks for taking a look,

June 15, 2023

Funny Frog Card With Stamp Layering

 Hello! Nadine here today with a funny frog card.

To create my card, I used several stamps and layered them up using masking paper. First, I stamped the Frog with Fly on a white cardstock card front. I then stamped it again on some masking paper and fussy cut it out, and layered the masking paper over the frog. Next, I stamped the Lily Pad over the masked frog and then stamped the lily again on some masking paper, fussy cut it out, and masked off the lily too. With the frog and lily still masked, I then stamped the Cattails on either side of the lily. Then masked the Cattails off. Then, I stamped the Frog's Fly with the OMG! and the Frogs Are Lucky sentiment. I also masked off the Frog's Fly. So all the stamp images were masked off except for the words.

Next, I used a strip of masking tape about at the same level as the frog's head, and below it I ink blended some blue ink for water. I then removed the masking strip but still left all the stamp images masked. I used a cloud stencil and some blue and grey inks to create a sky by ink blending. Then I lightly misted the ink blending with water, and placed a paper towel over it to soak up the water. This gave it a watercolor look. Once dry, I removed all the masking paper off all the images and colored them in with Copic Markers.

CRACKERBOX STAMPS USED:
Frog with Fly
Lily Pad
Cattails
Lily Pad & Cattail Set
Frog's Fly
OMG!
Frogs Are Lucky

OTHER CRACKERBOX PRODUCTS USED:
A2 Card & Envelope
Cardstock 80lb.

For a full list of supplies used, click HERE
See you next time! Until then, happy crafting!

March 17, 2023

Be A Caterpillar Card

Hello Stampers, Vicky here today, sharing a funny spring card.
I first stamped the Caterpillar, masked it, and then stamped Lady (Sassy Cindy). She was stamped with Memento and colored with Copic. I stamped Caterpillar Saying with VersaFine Clair. I cut the saying with deckle scissors in my stash of products. I love this saying because it can be used for any occasion.

Thanks for taking a look. Products below.
Vicky

February 26, 2023

Friends Are Therapists Card

 Hello crafty friends! Tracy here, and today I have a pretty little friend love card to share. Here are all of the details on how I created it.


I cut the card front from a piece of watercolor paper, then heat-embossed multiple butterflies all over it with black embossing powder. Add little bits of the pigment powders all over the card front. Then mist with lots of water. Move it around slightly to get the colors you want. I did blot off some of the excess water with a paper towel. Let dry, or dry with a heat gun. Stamp the sentiment onto white cardstock using black ink. Then mat that piece with black cardstock and add to the card front using foam tape. Adhere the card front to the white cardstock card base. The final touch is to add the Black Diamond Stickles around the edge of the card front.


Thanks so much for stopping by!
Tracy

February 2, 2023

Because You Are Special Card by Martha Lucia

Hello crafty friends, Martha Lucia here to share a new card with our wonderful collection of stamps. This is a Because You Are Special Card created with two different stamps. Let me share the card first, and then I will give you the details.


First, I created the card base using smooth white cardstock and a second layer of Old Olive Cardstock. Then, on a separate piece of White Smooth Cardstock, I stamped the Large Honey Pot with Flowers and the sentiment Bee-cause You Are Special with Memento Tuxedo Black Ink. I colored the images with Tri-Color Brush Alcohol Markers from Spectrum Noir.


After coloring the Large Honey Pot with Flowers, I placed a honeycomb stencil on top of the image and, with distress ink, created a faux texture on one of the corners. Additionally, I resized the layer to coordinate it with the card base.
Stamps Used:

Thanks for stopping by, and I will see you soon with more inspiration.

December 28, 2022

BFF Friends Card

Hi everyone, well Christmas has come and gone, and soon it will be 2023 how time flies as you get older.  Today I am sharing a card using these cute buggies yea… bugs can be cute, right?  Ok, maybe these guys are up to no good, but nonetheless, they are pesty besties… 

I started to make them cutesy but decided to hold off.  I have an idea, but you will have to come back to see next time.  Hope you enjoyed these guys 

Stamps Used:
Bug Set
BFF

December 22, 2022

Caught A Bug Card

Hello, Nadine here today! It is that time of year when lots of bugs are going around. Send those sick ones a card to make them smile to help them feel better.


I stamped each of the bugs and colored them with Copic markers, and then die cut them out with circle dies. I stamped the Bug-B-Gone Can and colored it with Copic markers, and then fussy cut it out. Next, I stamped the Caught A Bug sentiment and die-cut it out with a rectangle die. I blended some grey ink on the edges of each stamped die-cut piece with a blending brush. Arranged the stamped pieces on the front of my card and added some green dimensional crystal dots.

Stamps Used:

For a list of all supplies used, click HERE.

November 10, 2022

Caught A Bug Get Well Card

Hello, Stampers! Vicky is here today with a get-well card. Fall is here, and the flu and colds will soon be here. I am getting started on my get-well cards. 

The new Bug With Spots is one of 3 bugs that are new this month, and he fits well in the Medicine Bottle. The Bug Be Gone Can is also another new stamp. Check out all of our New Stamps!


Stamps Used:
Thanks for stopping by!
Vicky

October 6, 2022

Halloween Lab Card

 Hello! Nadine here today with a Halloween Lab card.

I used several new Halloween stamps from Crackerbox Stamps and a couple older ones to create my card. I first added some green paint along the top of my card front and let some of it run down to create drips. Then I stamped the Test Tubes and the Potion Bottle Tall and colored them in with Copic Markers. Next, I stamped the Corner Web to make it look like it was on the top of the Test Tubes and again in the top corner of the card front. Then stamped the Spooky Spider on one of the webs. I stamped some of the Potion Bottles, colored them with Copics and fussy cut them out, and adhered them with foam squares. For the sentiment, I used the Happy Halloween with Webs stamp.

STAMPS USED:
Happy Halloween with Webs
Test Tubes
Potion Bottles Set of 4
Potion Bottle Tall
Potion Bottle Round
Potion Bottle Thin
Potion Bottle Wide
Spooky Spider
Corner Web

July 12, 2022

Stenciled Card with Snarky Stamps

Hello there, Martha Lucia here to share a card created with a stencil and two fabulous stamps Some People Speak and the Mosquito Bug.


The process to create this card was very simple. I first created the card base using White Smooth Cardstock. Then I cut a second layer that I stenciled with VersaColor White Pigment Ink.
I let the ink dry naturally and after a while, I stamped the sentiment onto a piece of white smooth cardstock. Then I stamped on the upper part of the Mosquito Bug and fussy cut it with scissors. 
Additionally, I resized the layer of the sentiment using a Scalloped Stitched Rectangle Mini slimline Die that I cut above the middle. I arranged all the pieces with Crafty Foam Tape to have different levels and made them more attractive.

Thanks for stopping by and if you want to see more photos and details about this card, you can find them in my STAMPARTPAPEL Blog.

Stamps Used:

January 23, 2022

Sweet Valentine Cards by Martha Lucia

Hi friends, Martha Lucia here. Today I have some cards created with the new Valentine Stamps from Crackerbox. This mini-release just arrived in the store and includes images and sentiments!!! And of course discounts!!!


This card features the Candy Heart Open, Candy Heart Snark, Candy Heart Sassy, and Candy Heart Sweet. The first stamp is simply the heart image, the next three are set of sentiments that can be stamped inside of the heart.
I stamped mine onto white smooth card stock using Memento Tuxedo Black Ink. Then, I colored each with Illustrator Markers from Spectrum Noir using red and pink tones to create different shades. Additionally, I fussy cut each heart with scissors and left the hearts aside for a while.
To make my card more attractive, I die-cut a second layer with the large size of the Zig Zag Rectangle Dies. I decorated this layer with the Frostbite Stencil using the same color of ink as the cardstock. I love this tone to tone effect with this beautiful stencil. In addition, I splattered the entire layer with white paint and Fireworks Tuxedo Black.
________________________________________

My second card is a snarky valentine card that features a new valentine sentiment in combination with an "old" stamp. On this card, I am using the All You Need In World Sentiment and the Caterpillars.


To make this card, first, I stamped the All You Need in World onto white smooth card stock. Then, I die cut a window onto the second layer of designer paper. To cut the window, I used one of the dies included on the Cloud Nested Label Dies.  I continue the process pasting first the stamped sentiment and then, the designer paper layer.

As a final touch, I just add some caterpillars that I stamped onto white smooth card stock and colored with TriBlend Markers from Spectrum Noir.

If you want to see more details, colors, and products that I used to create my cards you can find them all HERE in my STAMPARTPAPEL BLOG

Thanks for stopping by and Happy Shopping!!!
Martha Lucia

January 4, 2022

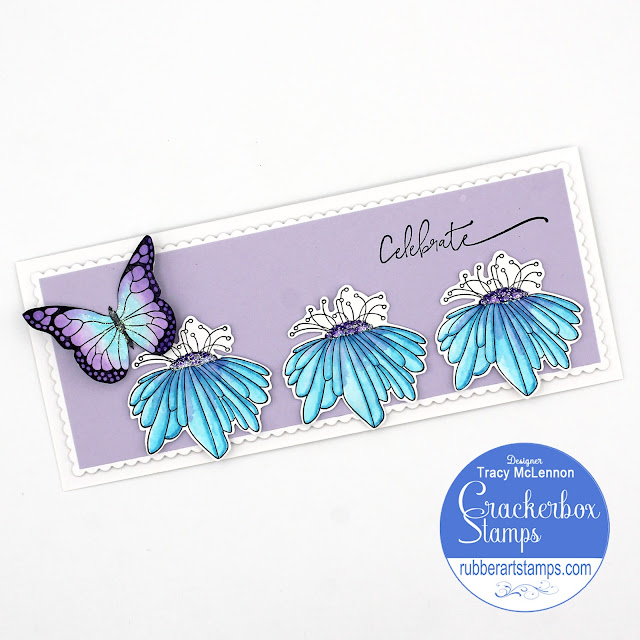
Celebrate Everything Slimline Card

Hello crafty friends! Tracy here, and today I have a pretty little card to share created using some of my favorite stamp images. In times like right now, I just think we should celebrate more. Celebrate everything! Here are all of the details. 


Crackerbox Stamps Used:

Other Products Used:
Archival Ink- Jet Black
Zig Clean Color Markers
Waterbrush
Cardstock- White, Lavender
Stickles
Picket Fence Slimline Dies
Scrapbook Adhesives by 3L- Thin 3D Foam Squares, Crafty Foam Tape, E-Z Runner Petite

Create a simple layered background using white and lavender cardstock and the scalloped slimline die. I added the simple Celebrate sentiment to the lavender cardstock layer using black ink. Adhere the lavender cardstock to the scalloped cardstock layer. Then adhere to the card base using foam tape.

Stamp the side bloom image onto white cardstock 3 times, and add color to them using Zig Clean Color Markers and a water brush. Once dry I added Stickles to the tops of each flower. Stamp the butterfly using the same black ink and add the same colors and a water brush. Add Stickles to the butterfly as well. Once dry, fussy cut out all of the images. Add the flowers along the bottom of the card using foam squares. Shape the butterfly slightly and then add to the corner of the card using adhesive dots.

Thanks so much for stopping by!

July 21, 2021

Cute As A Bug Caterpillar Card

 Hello! Nadine here today sharing this cute as a bug caterpillar card I made using the July Card Kit #10.

I  started with the Triple Scallop Square Swinging Z-Fold Cardbase that comes in the July Card Kit #10 and stamped the top half of the Be A Caterpillar sentiment stamp that comes in the kit on the front of the card. Then I stamped the 3 Caterpillars that also come in the kit on the scallop squares.


Then I used some masking tape and taped off the sentiment area and the 3 scalloped squares. Over the sentiment that was masked off, I stamped the Branch with Leaves Stamp. Then I removed the masking from the sentiment but not the scalloped squares with the caterpillars I used a blending brush and blended in some VersaMagic Blue Ink around the stamped images on the front of the card.
Then I colored in the images with Copic Markers.


On the inside of the card, I stamped the Branch with Leaves Stamp again and added more blending ink, and stamped the bottom half of the Be A Caterpillar sentiment stamp.


Happy Crafting!

July 20, 2021

Summer Ant Picnic Cards

Hello, Stampers! Today I have some hungry ants stealing some watermelons.
What I like about these cute little guys is that they can carry anything you want them to carry. I used a Stamp-A-Ma-Jig to position the watermelons on the ants.

Stamps Used:
Ant Picnic-Ants set of 6
Another card I made with the ants:
Don't miss our Card Kit Sale!

July 13, 2021

Creating Fun Cards with Crackerbox & Suzy Stamps Card Kits!

Hi Everybody, Cornelia here today. Some of the products I have used have been provided to me by various companies I design for. Affiliate links may be used in the links provided below.
 I made this card using the card base from the July card kit and some older stamps from Crackerbox & Suzy Stamps


The two card kits are - set 9 and set10.
I used some old patterned paper from my stash, sponged over it, and added the sentiment, mosquito, and some extra flies. I stamped the mosquito again on a piece of scrap paper, colored it, and cut it out. Glued it over the mosquito on the patterned paper panel.
I stamped the frogs onto the flaps with some masking. Colored them as well.

Here are all the stamps I used:

I must say I really enjoy using the kits. I would otherwise never bother with those kinds of special folds. But they make it really easy!


I hope you liked this. Thanks for visiting!
Happy Stamping!

July 12, 2021

Card with Movement by Martha Lucia

Hello crafty friend, Martha Lucia here to share with you a card with movement! I am featuring the Card Kit 10 of Crackerbox & Suzy Stamps. One of the two kits released this month. These Card Kits are Z Fold Cards that include card bases and stamps.


First, I cut a strip of basic black card stock to paste behind the three square panels. Then, I stamped each of the three caterpillars included on the Card Kit 10  with Memento Tuxedo Black Ink. In addition, I colored each image with Illustrator Markers from Spectrum Noir and fussy cut them with scissors.

To make the front of the card, I die cut a piece of designer paper with the second size of the Scalloped Stitched Rectangle Mini Slimline Die. I pasted it directly over the card base with E-Z Runner Tape. Additionally, I partially stamped the sentiment or edited the sentiment, included it on the Card Kit 10, and die-cut it with a Scalloped Circle.

TIP: To give more dimension and make the card more attractive, I paste the small images with crafty foam tape.


Like this is a stamped card with movement, a Z Fold Card; I just stamped the second part or lower part of sentiment included on the Card Kit 10.


Remember that if you buy both kits of the month, you get 25% OFF on the second kit. You can find all the details HERE.

Thank you for stopping by and if you want to see all the details about the products that I used to create my card, you can find them HERE in my Stampartpapel Blog.

July 5, 2021

Card Kit 10 - Love to be a Caterpillar

  Hi Everybody, Cornelia here today! Some of the products I have used have been provided to me by various companies I design for. Affiliate links may be used in the links provided below.

 It's July, so we are introducing a new card kit for this month at Crackerbox & Suzy Stamps


As you can see, I used Set 10 for my card.


I used some old patterned paper from my stash, sponged the edges and stamped half of the sentiment on it, and added the little butterflies.
I stamped the caterpillars onto the flaps and then again onto a piece of scrap paper. Colored them with Copics and cut them out and glued them onto the flaps.


Stamped the reminder of the sentiment into the inside of the card and added two more butterflies (MonarchOlesya's butterfly).
I must say I really enjoy using the kits. I would otherwise never bother with those kinds of special folds. But they make it really easy! 

I hope you liked this. Thanks for visiting!
Happy Stamping!

April 4, 2021

3 Butterflies 2 Cards: Part 2

 Hello crafty friends! Tracy here, and today I am sharing Part 2 of my 3 Butterflies 2 Cards series. Below you'll see both cards and you can read more about the first card I shared HERE. Then, the details on how I created my second card.


Crackerbox & Suzy Stamps Used:
Monarch Butterfly

Other Products Used:
Zig Clean Color Markers, Waterbrush, Staz On Ink- Jet Black, Enamel Dots, Embossing Pad, White Embossing Powder, Cardstock (White, Black)

I started my card creating a white A2 card base. Then cut a piece of black cardstock to 4x5.25. I freehand cut the wave. Then matted that edge with white cardstock. Adhere the larger piece of black cardstock to the card base. Add the sentiment to the smaller piece using an embossing pad and white embossing powder.


Add the sentiment piece to the card using foam tape. I added the coordinating enamel dots to this piece as well.

I added colour to the butterflies using Zig Clean Color Markers and a waterbrush. Then in the previous tutorial for the first card, I cut all of the butterflies in half. I used the right hand wings on the first card, and the left hand wings for this card. 

I shaped the butterfly wings with my fingers slightly. Then adhered the wings along the curved edge using adhesive dots.


Thanks so much for stopping by!

March 26, 2021

3 Butterflies 2 Cards: Part 1

Hello crafty friends! Tracy here, and today I have a pretty little birthday card to share. It's part 1, as soon I will be sharing a second card created using the other halves of my 3 butterflies. Hence the title, 3 Butterflies 2 Cards. Here are the details.


Other Products Used:
Cardstock- Black, White
Pink Paislee- Go the Scenic Route Patterned Paper
Embossing Pad
White Embossing Powder
Archival Ink- Jet Black
Zig Clean Color Markers
Waterbrush
Scrapbook Adhesives by 3L- Adhesive Dots Micro, E-Z Runner Petite, Crafty Foam Tape

Start by stamping 3 Monarch Butterflies onto white cardstock using black Archival ink. I added color to them using Zig Clean Color Markers and a water brush. Once dry, I snipped the butterflies in half.
Cut the black cardstock to 4x5.25 and stamp the sentiment onto the card using an embossing pad and white embossing powder.
Cut a strip of the patterned paper that is 5.25x0.75 and add a strip of black cardstock to create a mat on one side. Adhere the black cardstock to the white cardstock card base, then add the patterned strip to the left-hand side of the card using foam tape. Shape the butterfly halves slightly with your fingers. Then adhere to the left-hand side of the card using Adhesive Dots.

Thanks so much for stopping by!
Tracy