August 15, 2025
August 5, 2025
Bold Geometric Cows
July 9, 2025
You’re Clawsome
Hello crafters, Timothy here today sharing a card to show someone just how “clawsome” they are.
I started with a fun piece of pattern paper for my background. I used a neon green cardstock for the base. I stamped, colored and cut out the Crab Happy (small) stamp. I used some alphabet dies to create the sentiment. Cork paper was used to give the illusion of sand. I cut out a piece of coral for the background and finished the card by adding enamel dots. Have a great day!!
Timothy
Stamp Used
June 23, 2025
You Lucky Duck Card
May 20, 2025
Black and White Graduation Card
December 31, 2024
Minions Valentine Wedding Card
September 17, 2024
August 17, 2024
Black Cat Appreciation Day
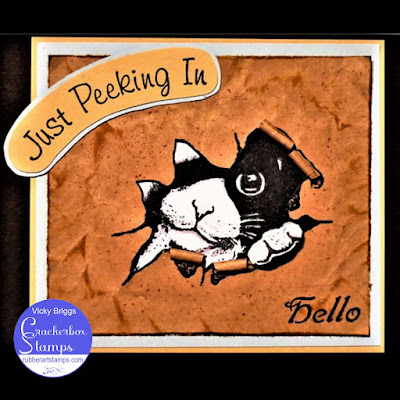
Hello Stampers. Vicky here today, and today, Aug. 17th, is Black Cat Appreciation Day, so I made a couple of cards with our Peeking Cat.
I crunched up the bag and lightly put a brown ink pad over the peaks.
I cut out the image on the paper bag and curled the paperback.
The white piece of cardstock was put behind the paper bag's opening.
Stamped Hello in the corner.
Just Peeking In was stamped on white cardstock, cut out, and mounted.
July 2, 2024
Copic Frog Birthday Balloon Card
Hi everyone! Toni here sharing a cute birthday or congratulations card. Ooh, or graduation! I love it when a card can work for multiple occasions!
I first stamped out one of the frog images from the Frog 1 photopolymer set then masked its right side and stamped the balloons from Birthday Set 2 so they would appear behind. I colored everything up with Copics.
Next I diecut some balloons and sponged them using Distress Oxides with their edges darkened by Catherine Pooler Inks. I had originally planned on having the sentiment on the green balloon in the back but thought the balance was off so instead embossed the Birthday Set 2 sentiment on a black strip and used it as grounding for the frog.
Be sure to check out the 4th of July sale. It includes everything not already on sale. Woo hoo!
For a full list of products used and to see my other projects, feel free to visit my blog, Frankie Helps Craft. Have a great rest of your week!
April 15, 2023
Graduation Card
Hello! Nadine here today with a flag banner shaped graduation card. The card can be customized to whatever the graduate's school colors are. The school colors for the card I made are blue and gold, so that is what I used.
I used a flag banner shaped die with navy blue cardstock folded in half to create the card base. I left the top edge of the die hanging over the folded area of the card so it did not cut there and left a hinge for the card to open. I then die-cut out some smaller flag banners, one in gold foiled paper and two in white cardstock. I stamped the Your Future Is Golden sentiment on one of the white pieces. I stamped the Graduation Cap and Diploma Scroll on some scrap pieces of white cardstock, colored them in with Copic Markers, and fussy cut them out. I used some glitter markers to color the tassel on the cap and ribbon in the scroll and then flicked some of the glitter ink onto the front of the card front with the sentiment on it. Matted the card front with gold paper, adhered it to the navy blue card base, and added some confetti sequins.
I adhered the other white flag banner I cut out to the inside of the card and stamped the Congratulations Snarky sentiment on it. My card fits perfectly into an A2 size envelope.
CRACKERBOX PRODUCTS USED:
Your Future Is Golden
Graduation Cap
Diploma Scroll
Congratulations Snarky
80 lb. White Cardstock
A2 Envelopes
For a full list of supplies used, click HERE
April 30, 2022
Congratulations On Your New Kitten
May 4, 2020
Sunflower Congratulations

Other Products Used:
MISTI
Archival Ink- Jet Black
Distress Ink- Ground Espresso
Zig Clean Color Markers
Waterbrush
Distress Stickles- Tea Dye
Cardstock- Brown, Kraft, Ivory
Scrapbook Adhesives by 3L- Thin 3D Foam Squares, 3D Foam Squares, E-Z Runner Petite
I stamped the sunflower image 3 times onto ivory cardstock and then added colour to the images using Zig Clean Color Markers and a waterbrush. Then once dry I fussy cut the tops of the flowers out and then added Distress Stickles to the middle of each flower. Let dry.
Create a simple cardstock layered background for the card and ink the edges in brown ink. Using the MISTI I added the Congratulations sentiment to the ivory cardstock layer. Add the sunflowers to the brown cardstock strip on the card using 3D Foam Squares.


