Showing posts with label Easter Cards. Show all posts

March 31, 2024

March 19, 2024

Easter With Cute Bunny Card

 Hello, stampers. Vicky is here today with a cute Easter card.

I stamped Bunny With Hat and then Smell Jelly Beans.
I used the Jar for the candy. You can put a lot of things into this jar.
I started stamping the jelly beans at the bottom of the jar first, then masked them as I added them to the jar.
Have a great day!
You can see all of the Easter stamps HERE.

March 18, 2024

Hoppy Easter

 Hello cardmaking friends! Today I have a sweet little Easter card to share using some fabulous stamps from Crackerbox Stamps. Here are all of the details.


Crackerbox Stamps Used:


Other Products Used:
Media Gloss Spray- White, Lime, Lemon
Archival Ink- Jet Black
Zig Clean Color Markers
Cardstock- White, Pink
Scrapbook Adhesives by 3L- Creative Photo Corners White, E-Z Runner Grand, Thin 3D Foam Squares

Cut a white cardstock card base and a pink cardstock card front. Stamp the sentiment using black ink onto the bottom of the pink cardstock. Then using the sprays, splatter the top portion of the pink cardstock card front. Attach the pink cardstock card front to the white cardstock card base using photo corners. 

Stamp the Bunny image onto white cardstock using black ink. Add color to the image using Zig Clean Color Markers. Fussy cut out the image and add it to the top of the card front using Thin foam squares. 

Thanks so much for stopping by!
Tracy


March 12, 2024

Easter Bunny Card

Hello! Timothy here today with a Easter Bunny Card.


I stamped the Bunny Standing stamp and
colored him with alcohol markers.
 I used the Hoppy Easter Every Bunny stamp for the sentiment.
I used some pattern paper and matted it with some 
cardstock layers.
To finish the card, I gave him a little bow from 
some sheer ribbon and added a few enamel dots.

Stamps Used

I hope you enjoy the rest of your day.
Timothy

March 9, 2024

Glitter Peep Easter Card

Hello! Timothy here today with a Glitter Peep Easter Card.


 I created this card by stamping the Peep Set of 3 stamp 
on glitter cardstock using black pigment ink.
Next I used black embossing powder and set it with a heat tool.
I layered blue and pink cardstock onto a white card base.
Using a scalloped die, I cut another layer from a piece of plaid paper.
Finally I added a grass layer and placed the Peeps and sentiment in place.

Stamps Used


I hope you enjoy the rest of your day.
Timothy


February 23, 2024

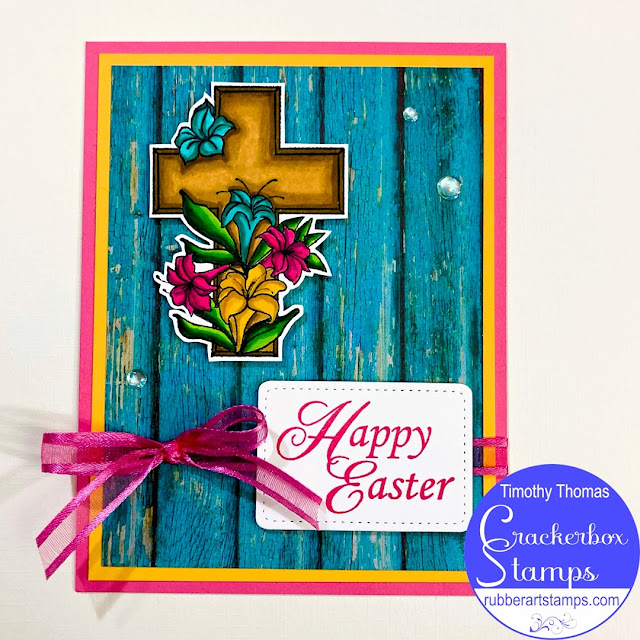
Cross And Floral Easter Card

Hello! Timothy here today with a Cross and Floral Easter Card.


I found inspiration for this card with this alcohol ink pattern paper from my stash. I used pink cardstock to mat each layer of my card. I stamped and colored the Cross with Lilies using alcohol markers.
I used a scalloped die to cut out the stamped image. I stamped the sentiment using the Happy Easter Fancy stamp and popped it up with foam tape.

Stamps Used

Enjoy the rest of your day, and remember to do something you love.
Timothy

April 2, 2023

Happy Easter to my PEEPS!

Hello and welcome! This is Shanna today from Caffeinated Craftiness, and I want to wish you all a Happy Easter!! Today's card is simple yet super fun to put together, and all images are from Crackerbox Stamps in beautiful red rubber!


Today's card features the following stamps:
Peeps Bunny Variations (I used small here)
Or there is a bundle called Peep Set of Three that includes both stamps and a larger Peep to use!

To make the card, I started off with a mini-slimline card base. I used a dot stencil from my stash for a smidge of background interest--but I wanted to keep the focus on the bunnies for sure. Next, I stamped a bunch of small Peeps onto scraps of pattern paper. This paper is almost like a printed watercolor pattern--which I loved-- then I fussy cut them all out.
My sentiment was heat embossed on a die-cut scalloped circle and added to the middle of the panel. Lastly, I spaced and adhered the small Peeps on either side of the sentiment.
The card comes together rather quickly, and I love how easily I could customize the colors to suit the recipient. Can you imagine yellow and pink for a favorite little girl in your life?? So many possibilities!

Thank you so much for stopping by! I hope you enjoyed my card, and I will see you all again soon!
~Shanna

March 27, 2023

Hoppy Easter Minion Card

Hello friends! Ericka here, and today I combined my love of minions with Easter!


I stamped these cute Bunny Ears and then stamped Carl on top to prepare him for the Easter festivities. I love these cute minions because you can dress them up with all types of accessories. I added these fun carrots and Easter eggs to finish my decorations. I colored up my images with watercolor brushes, stamped the Hoppy Easter sentiment, and heat embossed it. All in all, this is a quick card to make but one I am sure my nephew will love it! Thank you for stopping by, and have a wonderful week!

March 22, 2023

Simple Favorite Peep Easter Spring Card

 Hello! Nadine here, and today I am sharing a simple favorite peep Easter Spring card.


I started by creating the grass on the bottom of my card using a piece of mask tape and then using an ink blending brush to blend some green ink. Then using the little flowers from the Daisy Heart Flower Set, I stamped the flowers with the same color ink randomly over the ink blended area.


Next, I removed the mask tape and stamped the Chicks and the Favorite Peep. Then colored the chicks with a yellow Copic Marker, matted my card front with yellow cardstock, and adhered it to my card base. Easy Peasy!
NOTE: When I removed the mask tape, I accidentally got some ink on my finger and then touched the white part of my card, leaving a fingerprint. Luckily I did not have to start all over. Instead, I used my Ink Eraser and erased it. Phew, I was saved!

STAMPS USED:
For a full list of supplies used, click HERE.

See you next time! Until then, happy crafting!

March 19, 2023

Easter With Bunny & Chick Card

 Hello friends! Ericka here, and today I have an Easter card I made for my nephews using the Bunny and Chick stamps.

I love these cute little critters; they are so fun to color up. I started with a background I made using some shimmer spray. I masked a portion of my card to create a darker section. I stamped these cute critters and colored them up with watercolor pens. I cut them out with my Brother Scan and Cut and attached the Bunny and Chick to my backgrounds. I finished my card with the Happy Easter sentiment, and it's ready to send off.
Thanks for stopping by!

March 18, 2023

Snarky Easter Card

Hello crafty friends! Tracy here, and today I have a fun little Easter themed card to share. Here are all the snarky details on how I created it. 


First, I created a simple blended background using Distress Oxide Ink and a blending brush. Stamp the sentiment onto the left-hand side of the layout. Then I splattered mister around the outside of the card front. Let dry. Stamp the images onto white cardstock. Add color to the images using Zig Clean Color Markers and a water brush. Let dry. Then I fussy cut out the images. I added the bunny ears under the kitty image using thin 3D foam for a little dimension between the two images. 
Add to the card front using foam squares. Adhere the card front to the white cardstock card base.

Crackerbox Stamps Used:

Thanks so much for stopping by!
Tracy

March 14, 2023

Quick and Easy Easter Card

Hello and welcome! Do you like to make Easter cards?? I have a quick and easy one here today.
This card starts off by trimming a card panel to 3.75" x 5" and stamping the Solid Egg and Jellybean in different inks all over the panel. Then you will want to stamp and fussy cut the Bunny Ears out and set them aside. I die cut a black egg shape out, but this could easily be any shape-- and then I heat embossed the Smell Jellybeans Saying in white embossing powder. To assemble, I started with a yellow folded notecard and matted the stamped panel onto a black piece of cardstock. The Bunny Ears were attached to the backside of the sentiment egg, and then that piece was attached to the card with some foam tape. Add a few baubles for sparkle, and the card is complete!

STAMPS USED:

That wraps up my project for today! I hope you enjoyed it! I will return with another fun red rubber inspired card from Crackerbox Stamps!
~Shanna

March 11, 2023

Hoppy Easter Bunny Card

Hello Stampers, Vicky here today. I have a cute Easter card for you today. I laid out the stamps and found out where I would stamp the carrots. I stamped them first. I masked them and then stamped the bunny. I stamped the saying with VersaFine Clair.  
Isn't this Standing Bunny really cute?  He wishes Hoppy Easter Every Bunny! I colored the card with Copic Markers.
Thank you for stopping by to take a look!
Vicky

March 10, 2023

Eggstra Special Easter Card

Hello Stampers, Vicky here today. I made this 'eggstra' special Easter card with just two stamps. I stamped the saying, Eggstra, with Staz-On Pigment. I stamped the lower row of eggs, masked them, and stamped the upper layers.

I colored the eggs with Copic Markers. They looked a little dull, so I used Copic Glitter Markers and colored over some of the eggs to make them glitter. You can't have Easter without a bit of glitter! I also drew around the saying with glitter markers. You can't see the glitter around the saying, but some glitters appear on the eggs.

Thanks for stopping by!
Vicky

March 6, 2023

You're My Favorite Peep Easter Card

 Hello! Nadine here today with a cute Easter Card.


I stamped the Peep Bunny 3 different times and colored them by airbrushing them with Copic Markers. I stamped the Eggs Decorated and colored them with Copic Markers. Then I fussy cut the Peeps & Eggs out. I stamped the Favorite Peep stamp for the sentiment and used a die cut to cut it out. For the grass, I cut into some green cardstock creating a bunch of thin strips, but the part I tucked under the sentiment I did not cut, so they were all still attached.

February 22, 2023

Do I Smell Jellybeans Easter Card

Hello everyone!  Nadine here again today with a sweet Easter card.


I created my card base and then folded the top corner down. Adhered some patterned paper on the folded down corner and on the card front, then adhered the folded corner down. I stamped the Smell Jellybeans sentiment on the inside of the card so it showed in the folded down corner. Then I stamped the solid Jellybeans in several different ink colors and fussy cut them out. I stamped and colored the Bunny Standing with Copic Markers, fussy cut him out, and then adhered the Jellybeans and Bunny to the front of my card.

STAMPS USED:

February 21, 2023

Stamped Background Easter Card

Welcome back to the Crackerbox Stamps blog today. I am sharing a stamped background card using “Bunny Blue” from the store and a “Happy Easter “ sentiment.

I stamped the bunny image several times to create my background and then stamped it again to be used as the focal point of the actual card by matting it and using some foam tape on the back.
Here you can see how adding the foam tape heightens the image and draws it away from blending with the background.  I colored the image but left the background uncolored.  I hope everyone enjoyed my post.

STAMPS USED:
Happy Easter
Bunny Blue

February 8, 2023

Watercolor Bunny Butt Card

Hello crafty friends! Ericka here, and I hope you are doing well. Today I have a fun Easter card using the Bunny Butt stamp along with this awesome Does This Tail sentiment. This would also make a great spring card for any friend needing a smile.


I made my background with some Lindy's Magicals in Shabby Turbine Teal and Rusty Lantern Lime. I love the sparkle these watercolor powders add to any project. While it was drying, I stamped the Bunny Butt and colored it up with some of my alcohol markers. I added some clear sparkle to the tail because every bunny needs a sparky tail lol. I fussy cut it out and attached it to my card with foam tape to give it a little dimension. I white heat embossed this awesome Does This Tail sentiment to go above the image.


Thank you for stopping by, and I hope you have a wonderful rest of the week!

April 7, 2022

Shake Your Cottontail Easter Card

Hello, Stampers! Vicky is here with a fun Easter card. I used some of our new Easter stamps for this card. I stamped Shake Your Cottontail and used a die to cut it out and mount it on the purple background piece.  I stamped the Bunny Ears and then Lady Laughing on the card and colored them. I masked around the image and stamped the background with the Background Dots-set of 3.
It was as easy as that!

Stamps Used:
Thanks for taking the time to look! 

April 6, 2022

Easter Tags

Hello Fellow Stamper! Vicky is here today. I made a couple of Easter tags that could be put in an Easter basket, used as a bookmark, or handed out.
I cut 2 tags, one dark purple for the background behind the cutouts on top. The top tag was cut out with the same die and the cutouts. I stamped the Egg With Feet on white card stock with a  die from Spellbinders. I stamped the Eggstra saying on white and cut it out.
On this tag, I used the same dies as the first tag, except I cut this one shorter. I stamped the Open Egg and then I stamped Daisy (Gerbera) Tiny inside the egg. Stamped the Eggstra saying on white card stock and used a Spellbinder die.

The tags are made from die cuts. I used Elizabeth Craft Design tags.
Stamps Used: 
Thanks for stopping by to look.