Showing posts with label Anniversary Cards. Show all posts

January 19, 2025

You're One In a Minon

 Timothy has a Valentine's Day card featuring Lucy to share with you today.
Pretty easy card for you to make and a way to use some of your smaller pieces of cardstock, and we all have those.
Stamps Used:

Other Stamps:
Thanks for taking the time to look!

January 8, 2025

You're My Knight Valentine's Day Card

 Hello Stampers. Vicky is here sharing a Valentine's Day card for the knight in your life!
I put the Castle on the card to get an idea of where the rock path would be.
The Knight was stamped and colored. I masked the flag, part of the Knight, and the two bottom hoofs.
The grass is colored in with markers.
I stamped the saying, Knight In Shining Armor, on light tan cardstock and cut it like a shield.
The saying was mounted on a dark gray and popped up.

Stamps used:
Knight & Saying set of 2 - Over $2.00 savings

I hope you enjoyed the card!

December 31, 2024

Minions Valentine Wedding Card

Hello, friends!  Toni here sharing an unconventional Minions Valentine card that could easily be used for a wedding.


I stamped and colored Bride Kevin and Frankin Bob.  The top hat and sentiment are from Minion 1.  I positioned the images on top of the lacy heart and embossed the sentiment in red, so it really pops.  How fun!

For a full list of products used and to see my other projects, feel free to visit my blog, Frankie Helps Craft.  Have a great rest of your week!


December 30, 2024

I Love You Anyways

 Timothy has a cute and funny card for a loved one on many occasions. 
Timothy started with a green card base. He used 2 different printed cardstock pieces that went together. This would be an idea to use your scrap pieces. He added a ribbon for texture.
He die-cut a circle and popped it up. The Silly Squirrel was stamped, colored, cut out, and popped up.
You're Nuts was stamped, cut out and popped up.
Hope you enjoyed Timothy's card with the cute squirrel.

September 3, 2024

Minion Mischief and Easy Card Backgrounds

 Hello and welcome!  This is Shanna today for Crackerbox Stamps  and I have a brand new card featuring our favorite yellow-banana loving- mischeif makers!! MINIONS!


Today's card features the following stamps:
I had a lot of fun coloring Sassy Dave and his Fart Gun!  I fussy cut them both off, cutting around Dave's arm so he could "hold" the Fsrt Gun more effectively *hehe*.  

My background was made by ink Smooshing distress oxides onto watercolor paper.  Oxides are a lot of fun for this technique because they have the ability to "layer" on top of each other since the are somewhat opaque.  The key to not having the colors overman together is allowing the colors to dry before adding one on top.  I used Squeezed Lemonade, Blueprint Sketch, and Lost Shadow to create my background.

Once the background was completely dry I heat embossed my If People are Talking sentiment and stamped the Poof onto the background panel in black and gray inks.  The focal images were added to the panel using liquid adhesive to keep it simpler to mail.  

Thanks so much for dropping by!  Be sure to return again soon for another dose of Crackerbox Stamps inspiration!

January 31, 2024

Snarky Marriage Card

 Hello friends! Ericka here, and today I have a fun, snarky card for the married people in your life.

 I love the fun Marriage Is Like sentiment, and for my card today, I paired it with the Cards Suit Hand. I used some Lindy's Magical sprays on my background, and once it was dry, white heat embossed the Marriage Is Like sentiment. On a separate piece of paper, I stamped the Cards Suit Hand with Versafine Clair Nocturne ink and clear embossed it. I fussy cut the cards out and attached them to my background with foam tape. Thank you for stopping by, and if you love a little snark, be sure to check out these fun sentiments!

January 23, 2024

A Winter Slimline card

Hello, Vicky here with a winter sweet friendship card. 
It has been snowing here in Wisconsin, so this should fit the day.
I stamped the saying Igloo Warmth, in the middle first.
The Igloo was stamped with Memento Tuxedo and the gray lines in the ice.
On the right side of the card, I add the Sammy.
The last thing was to add the Snowflakes. I stamped off and then stamped the card. I wanted faint, light snowflakes.
I added white Applique and puffed it up with the heat gun.

Stamp Used:
Thanks for taking a look!
Vicky

August 13, 2023

Snarky Marriage Card

Hi Everybody! Cornelia here today. I am back with my Crackerbox Stamps post for this week. Crackerbox Stamps recently had a new release with hilariously snarky sentiments. One of which I used here.


For the background, I used patterned paper. I stamped the cards twice on scrap paper and colored them with alcohol ink markers, and cut them out. Added them to the paper and stamped half of the sentiment (I cut the stamp apart, but you can mask it if you don't want to do that). Stamped the heart and diamond and cut them out, and added them as well. Stamped the rest of the sentiment into the inside of my card.


And perhaps you want to check out those:
I hope you liked this. Thanks for visiting!
Happy Stamping!

August 1, 2023

Two Hearts and a Diamond Marriage Card

 Hello crafty friends! Tracy here and today I have my first card created using the fabulous new stamp release from Crackerbox Stamps.


Crackerbox Stamps Used:

Cut a card front and card base from white cardstock. Using Distress Oxide ink and a blending brush, blend the edges of the card front. Using black ink, add the suit image around the border. 

Using the MISTI, I added the sentiment onto the middle of the blended card front using black ink. Adhere the card front to the white cardstock card base. Stamp the card image onto white cardstock and fussy cut out. Add to the bottom right-hand corner of the card front using foam squares. 

Thanks so much for stopping by!

February 10, 2023

Masculine Valentine For A Sweetheart

Hello Craft Friend. I am Vicky, and this is a card I made for my husband. He likes trucks, and the older, the better. I like this truck because Crackerbox has many things that you can put in the back of the truck. I decided to put in the heart candy.

I masked Candy Heart Med. set of 4 to put in the back of the truck. The way I colored the Big Tree 2 was to dot different shades of green rather than coloring it in solid.
I used the Candy Hearts Sm. set of 2 on the door and put our initials in it.
Stamps Used:

February 6, 2023

Wild Thing Valentine's Day Card

 Hello! Nadine here today with a wild thing monkey Valentine's Day card.

For my card, I started by stamping the Candy Heart several times on my card front and then colored them in with Copic markers. Then with VersaMark, I stamped the Candy Heart Sassy Sayings on them and heat embossed them with white embossing powder.
Next, I stamped the Monkey Love image and colored him with Copic makers. I traced a circle around the monkey and cut him out, leaving his tail, hand, and foot hanging off the edges of the circle. Then adhered him to the center of my card front with foam squares.

On the inside of my card, I stamped the Wild Thing sentiment in black ink and the Lips in red ink.

STAMPS USED:
Monkey Love
Candy Heart & Sassy Sayings Set
Candy Heart
Candy Heart Sassy Sayings
Wild Thing
Lips

For a list of all supplies used, click HERE.
See you next time! Until then, happy crafting!
Nadine

February 5, 2023

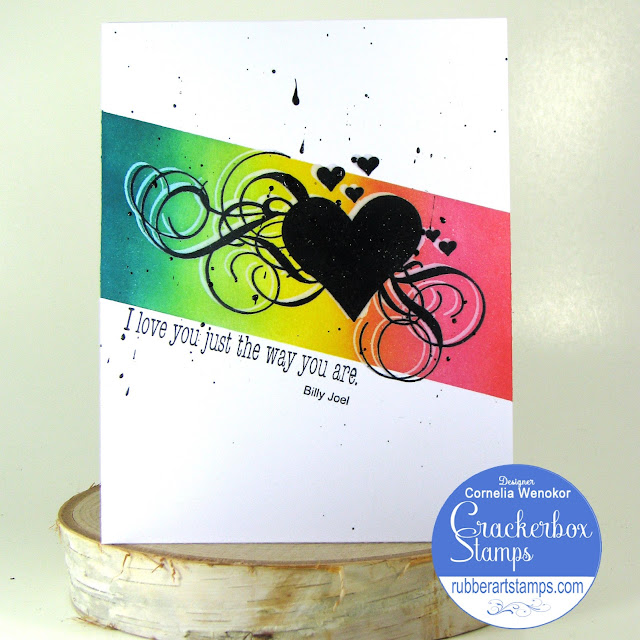
I Love You Just the Way You Are Card

Hi Everybody, Cornelia here today. Since Valentine's Day is coming, I figured a love-themed card is in order! I have made a similar card in the past - CASeing myself if you will...


I first stamped the heart with Versamark. Shifted the card a bit in my Misti and stamped it again with Versafine Clair black ink. Heat embossed with clear embossing powder. This way you get that white shadow. I masked a strip and sponged/brushed with distress inks. Added black splatters. Stamped the sentiment.

The stamps I used: 
Swirly Hearts
Just the way you are

I hope you liked this. Thanks for visiting!
Happy Stamping!

September 23, 2022

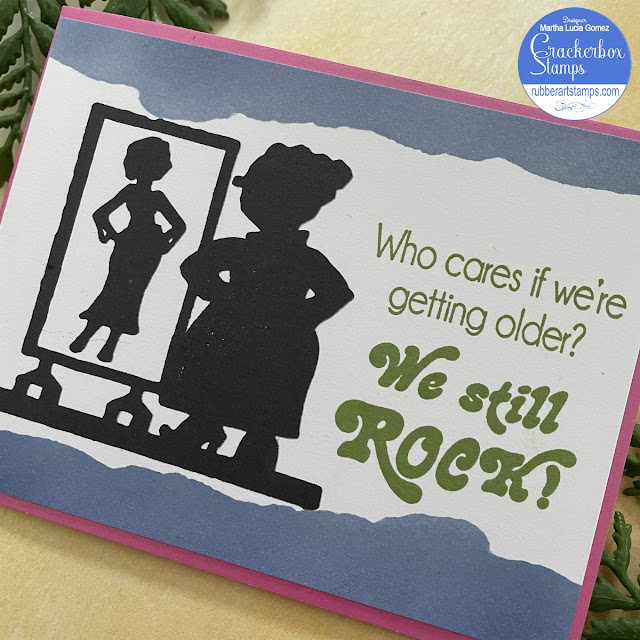
We still Rock Card by Martha Lucia

 Hi there, Martha Lucia here to share a card created with a combination of stamps from Crackerbox Store!


My card is one layer card with dimensions. First, I stamped the sentiment We Still Rock on the right side of white smooth cardstock using Memento Ink in Bamboo Leaves color.  Then, with VersaFine Onix Ink, I stamped the Inner You image.


With Faded Jeans Distress Oxide Ink and masking tape, I created the top and botton dorders before to paste the decorated layer over a Melon Mambo card base. 

Thanks for stopping by and keep in touch if you are looking for New Halloween Stamps, they are on this way!!!


Martha Lucia

June 30, 2022

Sweet Cheeks Birthday Funny Card

Hello Stamper! Vicky is here today with an easy card that can be for many occasions. This one is a birthday card, but can be used for an anniversary, thinking of you, or even a friendship card. I stamped Sweet Cheeks and mounted it. I also stamped Butt Guy, colored with Copic markers, and mounted him on black then a long blue colored card stock. This one was pretty quick and simple.  These stamps are some of our new anniversary stamps. You can see all of the anniversary stamps here.

Thanks for stopping by!

January 30, 2022

Love Is Like A Fart Card

Hello Stamper! Vicky here and I made a singing love card. Have you started your Valentine's Day cards yet? Do you think this could be used for a Valentine Card? I know my husband would think this is funny. I suppose this could also be used as an anniversary card or any other card.

Stamps Used:
Thanks for stopping by for a look!

July 16, 2020

Happy Anniversary!

Hello everyone! I'm Maria Pilar and I hope you are well. Today I have an anniversary CAS card.


On a white card, I applied foil to the Peony lg. stamp with the WRMemoryKeepers Foil Quill Freestyle by stamping it on top of the foil sheet. I took the opportunity to make some doodles around the peony.
On the other hand, I added the Happy Anniversary vertical stamp using Distress Victorian Velvet gluing a heart-shaped sequin between the two words.
I think it doesn't need any more decoration to get what I wanted: an elegant anniversary card.

I invite you to my blog for more details.

Remember that this month the categories in the promotion are: Anniversary, Animals and Food. In addition, if you share with us in the Facebook group a card where you use the promotional categories, you will have a $ 5 voucher to use in the Crackerbox & Suzy stamps store.


Thanks for stopping by and happy crafting!


July 2, 2020

Forever and Always

Hello everyone!

It's Donna here sharing a card  that can be used for a wedding or anniversary.  The rubber stamps I used are Bride and Groom and the sentiment is Forever and Always.  

If you have not joined the Crackerbox and Suzy Flaunt it if You Made it Facebook group please come join the fun.  There is a monthly cardmaking "theme" and July’s technique of the month is MASKING! There is a bonus if youu combine the technique of the month with a stamp from one of the sale categories, you get a 5.00 store credit towards you next purchase of amazing red rubber goodness!  

Here is my card for your inspiration.  


My card is an A2 top folding card. I stamped the Bride and Groom with black versafine ink, I then embossed it with clear embossing powder.  I then stamped the Forever and Always sentiment with the black versafine ink and embossed it also with clear embossing powder.  I then added clear rheinstones through the brides veil for dimension. 


Another view of the card.


The July special is:


Thank you so much, I hope you have been inspired.  Please come back again soon.

June 6, 2020

Simple And Elegant Wedding Card by Nadine Carlier

Hello! Nadine here today with a simple and elegant wedding card. Sometimes simple is more!


I first stamped the Bride and Groom stamp and the Forever and Always stamp with VersaMark and heat embossed it with some Iridescent Opaque Embossing Powder.


Then around the outer top edges, I stamped the swirly vail part of the Bride and Groom stamp with VersaMark and heat embossed it with some Iridescent Embossing Powder. Then using a sponge dauber and Delicata White Shimmer Ink, I blended it around the outside edges.
I created a very similar card like this one a few years ago, you can watch the video tutorial on it HERE.


Don't forget to visit the STORE and check out all of the stamps that are 20% OFF this month. All the stamps I used on my card are on sale the entire month of June.
Just add them into your cart and you will then see the discount on the stamps once they are in your cart.


Thank you for stopping by and happy crafting!
Nadine

Interested in the products I used? Products that are still available are linked to multiple shops below, for your convenience.
Lists may contain affiliate links where possible at no cost to you, what so ever. Affiliate and product disclosure can be found here.
I design for several companies because I genuinely love their products! Anything I recommend on my blog is something that I genuinely love and regularly use. I buy most of my own supplies. However, I do receive some free products to work with, and I sometimes make money for the projects I make. I DO NOT get paid for product reviews, I give my honest opinion about the products I use, and I will never recommend a product that I do not like or would not use.