January 13, 2025

January 12, 2025

Be My Valentine

Hello, Janet here with a sweet Valentine's card.
I stamped the Heart with Roses with Memento Tuxedo Black Ink. I colored it with markers and cut it out.  I cut a piece of pink polka-dot paper at an angle. Next, I embossed a piece of white cardstock with dainty hearts for the top angle. I centered the heart on top of that. I added some pearls as an embellishment to cover the seam. Be My Valentine is stamped with VersaFine Clair Nocturne Ink. I cut it out and layered it on dark red cardstock.

Stamps Used

Products Used

Thanks for taking a look! Hope you enjoy making Valentine's Cards as much as I do!


January 11, 2025

Grumpy Kitty Cat Lover Valentine Card

Hello, friends! Toni here, sharing a cat lover's Valentine's card.


I'm a huge cat lover and had such a great time coming up with this card.  

I started by choosing a variety of coordinating cat-themed patterned papers which happened to work well with my "middle finger cat" washi.

Next I colored up the Kitty Crabby Walter image pulling grays from the background. Then I stamped the I Hate You sentiment on a tag, layering a second tag beneath and tying them together with a bold black and white twine. 

For a full list of products used and to see my other projects, feel free to visit my blog, Frankie Helps Craft.  Have a great rest of your week!


January 10, 2025

Elegant Lady Card

Hello Stampers. 
Vicky is here to share a card with an elegant Deco lady that can be used for many occasions.  
I stamped the Deco Women and colored her with Copic markers, then I fussy cut her out.
The frame is a die-cut from my stash, which I mounted on gold cardstock. I added the lady to the gold cardstock. 
I had a white ribbon, which I colored in the middle for the top ribbon, and the sides to the bottom ribbon were the same blue I used on the lady. I wrapped the ribbon around the brown cardstock.
I mounted the frame with Deco Lady on brown textured cardstock. 
I had some flowers that I also colored with the marker.
I used a button for the middle of the flower, which I also colored.
The center of the flower is a brad, which I attached to the flower.
Hope you like the card.


January 9, 2025

Happy New Year Card!

 Timothy made this festive card to bring in the new year!
Timothy die-cut a couple of pieces of card stock as the base of the card. The letters are also cut using glitter cardstock.
He stamped, colored, and cut out Jumping Dave and added him to the card.
Gold embellishments were added.
Thanks for looking!

January 8, 2025

You're My Knight Valentine's Day Card

 Hello Stampers. Vicky is here sharing a Valentine's Day card for the knight in your life!
I put the Castle on the card to get an idea of where the rock path would be.
The Knight was stamped and colored. I masked the flag, part of the Knight, and the two bottom hoofs.
The grass is colored in with markers.
I stamped the saying, Knight In Shining Armor, on light tan cardstock and cut it like a shield.
The saying was mounted on a dark gray and popped up.

Stamps used:
Knight & Saying set of 2 - Over $2.00 savings

I hope you enjoyed the card!

January 6, 2025

Valentine Bear

 Hello and Happy New Year! Janet here with a sweet Valentine card. He will bring a smile to young and old. A quick and easy card to make.

I stamped the Bear with Heart in Memento Tuxedo Black Ink. The small hearts are also stamped with Memento Tuxedo Black Ink. I colored them with markers. Stamped I Love You with VersaFine Clair Nocturne Ink. Next, I used a stipple brush and pink ink to give the background some color. The image is laid inside a red frame and layered on Valentine's paper.

Stamps Used

Products Used

Thanks for taking a look. Don't forget your Valentine!

January 5, 2025

Cowgirl Birthday Card

Hello Stampers. Timothy has a tootin' tootin' birthday card.  
Timothy mounted a wood-printed card on a piece of black cardstock.
Printed the birthday saying, cut it out, and mounted it.
He cut out a large star shape on black cardstock.
Timothy stamped the Cowgirl Jane, colored her, and cut her out.
He cut out the word, bang and embossed it with embossing glitter, then cut around it on white cardstock.
Tim added black star embellishments.

Kitty Love

 Hello Stampers. Vicky here with a kitty love card.

I used a stamp positioner so the stamp would stamp in the same place. So I masked the leaves and hearts and stamped the Two Cats In A Tree.
Then, I inked the leaves and hearts and stamped the image towards the bottom of the card.
Love was stamped in the corner.
The Heart Plain was stamped and colored.
Then, I mounted the image on red, green, and black cardstock.
Thanks for taking a look, I hope you liked it.
Vicky

January 4, 2025

Live Today Card


Crackerbox Stamps Used:

Create the layered background using a white cardstock base, cut the patterned paper and a smaller layer of mauve cardstock, then the top layer of white cardstock. Adhere these layers together and add silver photo corners to the top white cardstock layer. 
Stamp the sentiment to the bottom of the card front using black ink. Stamp the Miss Prissy image onto a separate piece of white cardstock using black ink, and add color using Zig Clean Color Markers. Fussy cut out the image and added it to the card front using foam squares. 

Other Products Used:
Archival Ink- Jet Black
Zig Clean Color Markers
Cardstock- White, Mauve
Scrapbook Adhesives by 3L- E-Z Runner Petite, Thin 3D Foam Squares, Creative Photo Corners Silver
Unknown Patterned Paper

Thanks so much for stopping by!
Tracy


January 2, 2025

Thank You Card With Deco Women

 Hello Stampers. Vicky here with a thank you card. I added one of our beautiful Deco ladies.
I need to make a couple of thank you cards from Christmas.
I embossed a piece of cardstock, stamped the Deco Lady, and colored her.
Thanks was stamped next to her.
It was a pretty quick card but elegant.
Thanks for looking,

January 1, 2025

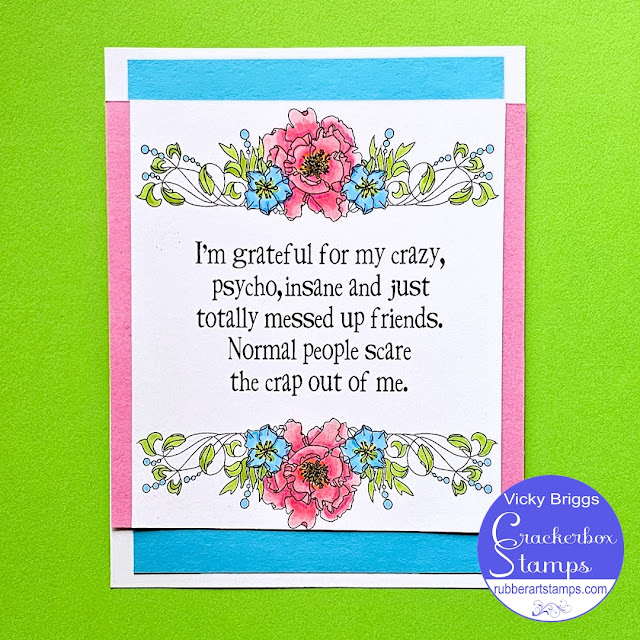
Crazy Friendship Card

 I hope you are having a good start to the new year.
Vicky here, and I wanted to start  2025 with some humor. 
I started out with the saying, Grateful For Crazy.  
I put the card on scrap paper and marked the center.
I stamped the Flower Border center where I marked the center on the top and bottom.
I could use this saying for all of my friends, LOL
Thanks for taking a look.

December 31, 2024

Minions Valentine Wedding Card

Hello, friends!  Toni here sharing an unconventional Minions Valentine card that could easily be used for a wedding.


I stamped and colored Bride Kevin and Frankin Bob.  The top hat and sentiment are from Minion 1.  I positioned the images on top of the lacy heart and embossed the sentiment in red, so it really pops.  How fun!

For a full list of products used and to see my other projects, feel free to visit my blog, Frankie Helps Craft.  Have a great rest of your week!


December 30, 2024

I Love You Anyways

 Timothy has a cute and funny card for a loved one on many occasions. 
Timothy started with a green card base. He used 2 different printed cardstock pieces that went together. This would be an idea to use your scrap pieces. He added a ribbon for texture.
He die-cut a circle and popped it up. The Silly Squirrel was stamped, colored, cut out, and popped up.
You're Nuts was stamped, cut out and popped up.
Hope you enjoyed Timothy's card with the cute squirrel.

December 29, 2024

A Winter Wonderland


Hello, friends!

Ericka here, bringing you a serene and peaceful winter card to close out the year. There’s something magical about winter landscapes, and today I’m sharing a design inspired by snowy days and quiet woods, featuring the beautiful Winter Butterflies sentiment along with some smaller, whimsical stamps.

Once the background dried, I stamped the Winter Butterflies sentiment, Snowflake, and Holly Snowflake Swirl using Versafine Clair Twilight ink, then clear embossed them for added depth and shine.

To bring the scene to life, I stamped the Spruce Tree in Versafine Clair Rain Forest and the Buck and Doe in Pinecone ink. These natural tones add an earthy touch, balancing the soft shimmer of the background.

For that extra touch of winter magic, I used a white gel pen to add “snow” to the stamped images and sentiment, creating the look of little snowdrifts piling on tree branches and the forest floor. It’s a simple detail that makes the scene feel so much more alive. To complete the card, I added a hint of elegance with some gold stitching—a subtle shimmer that ties everything together and gives the design a polished, festive feel.

Thank you so much for stopping by! I hope you’re enjoying these final few days of 2024, soaking up all the wintery wonder and warmth of the season. Here’s to a creative and joyful year ahead!

Happy crafting,
Ericka ❄️✨