Showing posts with label Minion Cards. Show all posts

November 27, 2022

Magic and Bright Minion Christmas Card

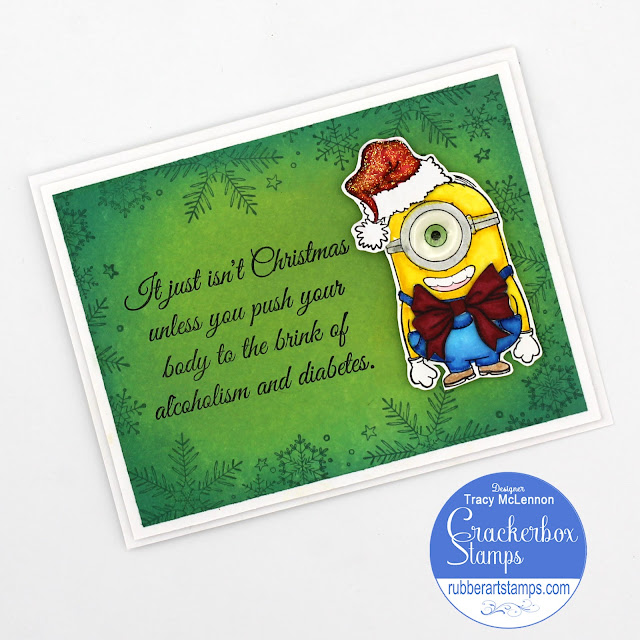
Hello crafty friends! Ericka here and I hope you all had a wonderful Thanksgiving. Today I have a fun Christmas card I made using Bob the Minion with and fun Santa Hat

 
I started by stamping Bob and masking the top to add the Santa's Hat stamp. I colored it all up with some watercolor markers and then added the Snowflakes and heat-embossed the with a Turquoise powder for some fun sparkle. I then added some light shading around the card with Distress Oxide ink Salvage Patina and for some added fun, I used Liquitex Glass Beads as snow on the bottom of my card.

I then decided I wanted to make Bob a little more fun and stamped him and the hat on a separate piece of paper. After coloring them up, I added them to my card using an action wobble so he became more interactive.

I finished my card by adding the Magic and Bright sentiment and used some clear sparkle to heat emboss the image. I love this Santa Hat and can't wait to use it on some more of my minions to make fun Christmas cards. Thank you for stopping by and I hope you have a wonderful week!

October 26, 2022

Don't Scare Me Halloween Card

Hello crafty friends! Today I am sharing another spooky festive card I created using some new and old Crackerbox Stamps images. Here are all of the details. 


Crackerbox Stamps Used:

Create a simple blended background using Distress Oxide Inks and a blending tool. Add the web images and the sentiment to the card using black ink.
Adhere to the white cardstock card base.
Stamp the images onto White cardstock and add color to them using Zig Clean Color Markers and a water brush. Once dry, add Glossy Accents to the goggle lenses and let dry.
Fussy cut out the images and add them to the card front using 3D Foam Squares.

Thanks so much for stopping by!
Tracy

October 9, 2022

A Halloween Minion Ghost Card

Hello Stampers, Vicky here today. BOO! Isn't this Minion cute? He is here trying to scare you.
He is one of the fun new Halloween stamps. I stamped Ghost Minion with Memento and colored it with Copics. Witching Hour and the Bats Flying By were stamped with VersaFine.
I used Distress ink around the edges.


Stamps I Used:
Check out ALL of the New Halloween Stamps

Thanks for looking!
Vicky 

September 19, 2022

Minion Wobble Birthday Card

Hello crafty friends! Ericka here, and today I have a fun minion birthday card I created for one of my students. I love these minions and all the great sentiments that go along with them.

I started by using Distress Spray Stains in Mermaid Lagoon and Squeezed Lemonade on Bristol Smooth paper. While my background was drying, I stamped the Stuart with Cupcake, and clear heat embossed him. I used watercolor markers to color him and then fussy cut him out.

I stamped the Once in a Minion sentiment along with the Birthday #7, and clear heat embossed them so they would stand out from my background.

I finished my card by attaching my minion to my card using an Action Wobble. I love these fun wobbles; they add a little extra fun to every card. Thank you for stopping by, and I hope you have a wonderful week!

August 19, 2022

Minion Breaking The Rules Card

Happy Friday! Ericka here, and I hope you are all doing well. Today I have a quick and fun card using the Stuart with a Cupcake stamp and a new sentiment, I Mean It's Sorta Exciting.

I started by stamping both the image and sentiment on Bristol Smooth paper and coloring it up with my Zig Clean Color Brush pens. I love this fun image; it goes so well with so many Crackerbox sentiments, including this one. After all, who hasn't eaten a cupcake for breakfast, especially around a birthday lol.

 I used a foam blending brush and lightly added some Uncharted Mariner Distress Ink to the corners of my panel. I then attached it to a pattern paper I had in my stash.
And there you have it, a quick and fun card that can be used for various occasions. Thank you for stopping by, and I hope you have a wonderful weekend.

July 27, 2022

Thanks A Minion Card

Hello crafty friends! Ericka here and today I have a thank you card featuring Phil the Minion. I love these fun minion stamps at Crackerbox and there are so many ways to use them.

I created my card by masking off my card base and blending distress ink in Salvaged Patina, Mermaid Lagoon, and Uncharted Mariner. I then used the top of my Uncharted Mariner and dipped it in the ink, and placed it on my card base to create lines. I also splattered some water on the paper to lift off some ink.

I stamped and colored Phil with watercolor markers and cut him out to add him to my card base. I finished my card with the Thanks a Minion sentiment, and clear heat embossed it. I lined it up a little sideways to match Phil's waving hand. Thank you for stopping by, and I hope you have a wonderful week.

July 26, 2022

Hope Everything Comes Out Okay Minion Card

Hello, stamping and cardmaking friends! Tracy here, and today I have a snarky little card to share. A card made for that special someone in your life. Haha 
Here are all of the details.


Crackerbox Stamps Used:

First, I prepped my simple card front starting with a piece of white cardstock. Using Spiced Marmalade ink and a blending brush and mat. I blended the card front. Stamp the sentiment on the left-hand side of the card front using black ink. Adhere to a white cardstock card base.
Stamp the Stuart and outhouse image onto white cardstock using black ink. Add color to the images using Zig Clean Color Markers and a water brush. Let dry, then add Glossy Accents to the goggle lens of Stuart.
Add the images onto the card front using thin and regular 3D foam squares.

Thanks so much for stopping by!
Tracy

June 4, 2022

Dad...You're One in a Minion Father's Day Card

 Hello, cardmaking friends! Tracy here, and today I have one last Father's Day inspired card to share. Here are all of the details.


Crackerbox Stamps Used:


I started my card by creating a simple blended card front using yellow ink. Then with a chosen stencil, I added green ink just around the edges of the card front. Add to a white cardstock base. Stamp the sentiment to the bottom of the card front using black ink.
Stamp the Minion onto white cardstock using black ink, and add color using Zig Clean Color Markers and a water brush. I added Glossy Accents to the goggles and let dry completely. Fussy cut out the image and adhere to the card front using foam squares.
I added the "Dad" using letter stickers matted in white cardstock and added that to the card front using foam squares.
Thanks so much for stopping by!

May 28, 2022

Happy Father's Day Minion Card

Hello crafty friends! Ericka here and today I have a fun Father's Day minion card with some distress ink blending.


I created my card by first blending Distress Oxide ink in lucky cover, salty ocean, and faded jeans. I then stamped the Man of My Heart sentiment and clear embossed it. I then stamped the Stuart Playing and fussy cut him out to color him up with my Copics.

I love this fun minion and thought he would be perfect for my Father's Day card and give my husband a little laugh. Thanks for stopping by and I hope you have a wonderful weekend!


March 5, 2022

Minion Bunny Easter Card

Hi Everybody! Cornelia here today. I made this card with the recent release stamps from Crackerbox Stamps. This release focuses on Easter. There are lovely new stamps and sentiments. Go and check them out HERE.

I first stamped the sentiment. Then stamped the Minion and masked off his hand with Scotts tape. Added the bunny ears and egg. I colored everything with Copics. Used a stitched die to trim the card and mounted it onto blue card stock.

The stamps I used:

I hope you liked this. Thanks for visiting!
Happy Stamping!

January 30, 2022

Love Is Like A Fart Card

Hello Stamper! Vicky here and I made a singing love card. Have you started your Valentine's Day cards yet? Do you think this could be used for a Valentine Card? I know my husband would think this is funny. I suppose this could also be used as an anniversary card or any other card.

Stamps Used:
Thanks for stopping by for a look!

January 26, 2022

I'd Sniff You First Card

 Hello, snarky card lovers! Today I have a fun little card to share, with a great snarky sentiment! Here are all of the details.


Crackerbox Stamps Used:

I created a simple layered background using patterned paper and white cardstock. Stamp the sentiment on the white cardstock card front using black ink. Add to the card using white photo corners. Add gems to the corners.
Stamp the small bow and Lucy the Minion onto white cardstock using black ink. Add color to the images using Zig Clean Color Markers and a water brush. Add Glossy Accents to the goggle and let dry completely. Fussy cut out the images. Add the bow to Lucy using a foam square, then add Lucy to the card front using foam squares again. Add Stickles to the bow for a little extra sparkle.

Thanks so much for stopping by!
Tracy

January 25, 2022

Whacked Friends and Dirty Minds Cards

Hello everyone!  It's Marcia on the blog today sharing two newly released sentiments. Both are so silly and perfect for friends. They would be great for friendship Valentines or just any time.

Stamps used:

I colored all images with Karin Brushmarkers and created simple layers with patterned paper from my stash. The minion card is a mini slimline--measuring 7" x 3"--and the other card is 4.25" x 5". They crack me up!!

December 26, 2021

Alcoholism and Diabetes Christmas Card

Hello crafty friends! I hope you are having a wonderful holiday season! I have been spending lots of wonderful time with family and friends. With that seems to come with lots of treats and a few drinks here and there. Hence today's snarky card, perfect for expressing how I'm feeling right now. Haha 


Other Products Used:
Distress Oxide Ink- Twisted Citron, Lucky Clover
Blending Tool and Mat
Archival Ink- Jet Black
Zig Clean Color Markers
MISTI and Stamptabulous Tool
Waterbrush
Stickles
Cardstock- White
Glossy Accents
Scrapbook Adhesives by 3L- Crafty Foam Tape, E-Z Runner Petite, 3D Foam Squares White

I created a simple blended background for my card front using Distress Oxide Inks and a blending tool. using the MISTI and the Stamptabulous tool I added the sentiment to the card front using black ink. Using the dark green ink, stamp a snowflake border around the card front. Mat the card front ink white cardstock and add to the card base using foam tape.
Stamp the bow, Santa hat, and Stuart onto white cardstock. Add color to each using Zig Clean Color Markers. Fussy cut out the images and adhere to the card front using foam squares. I added Stickles to the Santa hat for a little extra sparkle.


Thanks so much for stopping by!

December 6, 2021

Minion Christmas Slimline Card

 Hey, everyone! Nadine here today with a festive Minion Christmas slimline card.


I first stamped the Minion Carl Being Happy Stamp and masked off the top of his head when inking but left his hand out so it still stamped out. I then stamped Carl on some masking paper fussy cut it out and stuck it to the stamped image. Next, I stamped the Santa's Hat over the masked Carl. I love the Santa's Hat because you can take almost any of the stamp characters and make it Christmasy.
Then I fussy cut the stamped image out and colored it with Copic Markers. Added some Glossy Accents to the goggles and Snow-Tex to the white of the hat.


I then stamped some of the ornaments from Grinch Hand Set of 5 and fussy cut them out and colored them with Copics and added glossy accents.


On the background of the card, I used a large tree die and airbrushed it with different color Copic markers. and splattered it with metallic gold, red and white paints. Then on the top of the card, I stamped the sentiment 'tis the Season.

I hope I inspired you to give it a try.
For the full list of supplies used, click HERE.

Happy Crafting!

November 11, 2021

Nibble Nibble Minion Thanksgiving Card

Hi everyone!  Marcia on the Crackerbox Stamps (affiliate links used throughout) blog today with this silly Thanksgiving card. It occurred to me that I could stamp just the fork in Minion Phil's hand, ready for his turkey day feast. Poor turkey doesn't have a clue.. Googly eyes are always a great idea by the way. I colored the images with Spectrum Noir TriBlend alcohol markers.

Supplies used:
(affiliate links used; thank you!)

Card Kit #16 and Stamps - Oct
Minion Phil
Nibble Nibble
Turkey Goofy
Fat Pants
Silverware
Layered Cards

I stamped the Fat Pants sentiment on a piece of white cardstock. Then, used second-generation stamping with grey ink for the silverware atop the sentiment at the turkey at the lower right corner. I mounted this panel within the card.

October 20, 2021

Monster Fingers and Popcorn Halloween Riddle Cards

Hello Happy Crafter,
Vicky here today. How about a couple of Halloween riddles?
These sayings can be easily separated so the last half can be put inside the card.
I have used the popcorn riddle with the package of microwave popcorn.


I think this riddle is hilarious!
I used this saying, Monster Fingers wrapped around a package of Microwave popcorn.
Count Phil, sure is fun.
The Popcorn Kernel is fun to use with this card and with our other popcorn images and sayings.


What's in your horrorscope?
The Horrorscope saying has space so it's easy to separate.
The Witch with Crystal Ball can see many things.
Bats Flying By adds to the spooky look.
There are Web Corner Right and Web Corner Left in the background.
I added the Skull with Missing Teeth was added to the crystal ball.


Thanks for taking a look!
Hope your Halloween is spooky, scary, and safe.
Vicky

October 18, 2021

Something Wicked Minion Halloween Card

Hello crafty friends! Today I have a fun little Halloween themed card to share. I love all of the Halloween images available from Crackerbox Stamps. Here are all of the details.


Crackerbox Stamps Used:

Cauldron
Minion Count Phil
Something Wicked

Other Products Used:
Distress Oxide Ink- Wilted Violet, Twisted Citron, Black Soot
Archival Ink- Jet Black
MISTI and Stamptabulous Tool
Zig Clean Color Markers
Waterbrush
Media Gloss Spray- Eggplant, Lime
Cardstock- White, Black, Mauve
Scrapbook Adhesives by 3L- E-Z Runner Grand, 3D Foam Squares, Thin 3D Foam Squares

I started with a card front cut from mauve cardstock, then blended Distress Oxide Ink around the edges. I also splattered coordinating misters around the edges also. Using the MISTI and Stamptabulous Tool I added the sentiment to the left-hand side of the card front using black ink. Mat the card front in black cardstock and then add to the white cardstock card base.

Stamp the cauldron and the minion onto white cardstock using black ink. Add color to the images using Zig Clean Color Markers and a water brush. Fussy cut out the images.

Fussy cut out the stamped images. Add to the card front using foam squares and thin foam squares. 


Thanks so much for stopping by!

October 11, 2021

Count Phil Coffin Treat Boxes

Marcia here and today I am on the Crackerbox Stamps blog today with these fun Halloween treat boxes. These yellow dudes are a favorite of mine and I couldn't resist using Count Phil on some treat boxes for my girls. The sentiment was a custom stamp created by Crackerbox. Did you know you can order custom sentiments?! I colored this vampire Minion with Spectrum Noir TriBlend alcohol markers.

Supplies used:
Count Phil
Custom Sentiment

For a list of all supplies used, click HERE.

July 18, 2021

Grateful for Crazy Friends

Hello crafty friends! Snarky card alert haha
Today I'm sharing a fun little snarky card, perfect for making a friend smile. Here are all of the details. 


Crackerbox & Suzy Stamps Used:

Grateful for Crazy Friends
Minion- Stuart

Other Products Used:
Archival Ink- Jet Black
Zig Clean Color Markers
Waterbrush
Stickles
Distress Oxide Ink- Picked Raspberry
Blending Tool
MISTI
Glossy Accents
Cardstock- White
Scrapbook Adhesives by 3L- E-Z Runner Grand, 3D Foam Squares, Crafty Foam Tape

Create a simple blended background with Distress Oxide Ink and a blending tool. Then add the snarky sentiment using black ink and the MISTI. I added borders of stars along the top and bottom of the card front with black ink, then added Stickles to the middle of each. Let dry.
Mat the card front in white cardstock and add to the white cardstock card base using foam tape.

Stamp the Minion onto white cardstock and add color using Zig Clean Color Markers and a water brush. I used Glossy Accents to cover the glass of his goggle. Let dry completely. Fussy cut the Minion and add to the card front using foam squares.

Thanks so much for stopping by!