Showing posts with label Winter Cards. Show all posts

December 25, 2019

Merry Christmas with Maria Pilar

Hello dear friends! Maria Pilar here sharing with you this card at Christmas. So, I wish you all a very happy day full of love.

First of all, I embossed the Snowflake Background stamp with iridescent powders on white cardboard.
Then I stamped on it the Buck and Doe set of stamps placing them to create a Christmas scene.
I die cut this grid background also in white cardboard and I glued with double-sided foam tape, cutting out some lines so that the reindeer's looked good.
In the other hand, I stamped the Christmas Tree Coffee with Stazon ink and placed it on the top of the card.
I die cut a tag for Color of winter sentiment also glued with double-sided foam tape.

You still have a few days left to take advantage of the Crackerbox&SuzyStamps great promotions for December.

Thank you for visiting this special day. Merry Christmas!

December 19, 2019

Winter Warm Card by Martha Lucia

Hi there, Martha Lucia here with you! Today I created a colorful winter card using the beautiful Cool Deer, a non traditional Christmas image, and the combination of the sentiments Wishing you and Warm Winter.


The base of my card is Rich Razzleberry card stock and the second layer is watercolor card stock. I cut the second layer  of 3-3/4" x 5" to create a big space around it. With a a flat paint brush I added water to the watercolor piece and applied distress ink directly over the paper, creating strips of different colors. I let the paper dry naturally before to stamp the sentiments Wishing You and Warm Winter over it using VersaFine Onix and Clear Embossing Powder.


I pasted over the card base the colored layer using double sided foam tape and also pasted directly over it the Cool Deer image that I stamped on a separate piece of whisper white card stock with Memento Ink Tuxedo Black and colored with Illustrator Markers from Spectrum Noir.

This month all the stamps available at Crackerbox & Suzy Stamps Store are 30% OFF and all the Copic Markers & Stencils are 20% OFF. Find all stamps HERE!, Markers HERE and Stencils HERE


Happy Shopping!
I wish you a very happy Merry Christmas for you and your families!
See you soon!

December 18, 2019

Tinsel Cheer

Welcome back crafty friends! Tracy here and today I have a cool little festive card to share. Even if you have sent all of your holiday cards for this year....it's never too early to start creating for next year. Here are the details.


Crackerbox & Suzy Stamps Used:

Snow Girl                                Tinsel Cheer                  Cottage and Trees


Other Products Used:
MISTI
Distress Oxide Inks- Tumbled Glass, Cracked Pistachio, Worn Lipstick
Archival Ink- Jet Black
Embossing Pad
Ranger White Embossing Powder
Chameleon Pens
Blending Tool and Mat
Stickles- Diamond
Cardstock- White, Mint
Scrapbook Adhesives by 3L- Crafty Foam Tape, E-Z Runner Petite, 3D Foam Squares


I created a simple blended background using Distress Oxide Inks and my blending tool. Then using the MISTI I added the sentiment using an embossing pad and white embossing powder. I stamped the images using black ink and then added colour using Chameleon pens. Fussy cut the images and add to the card using 3D Foam Squares. I used Stickles to add snow to the background of the card, and then around the edge of the mint cardstock mat of the card front.

I also added Stickles to the snow around the winter Cottage, and the Snow Girl's hat. Who doesn't love a little extra sparkle.


Thanks so much for stopping by!
Tracy

December 12, 2019

The Color of Winter

Hello everyone!

It's Donna here featuring some winter stamps which are Snow Girl WavingSnow Girl Snowflake Trio, the sentiment is Color of Winter. The whole Crackerbox & Suzy Stamps store is 30% off for the month of December, ALSO Crackerbox & Suzy Stamps has 20% off of Copics and stencils

My card is an A2 card, I die cut the background layer and used some ink to ink the background.  I then die cut the snow bank the girls are standing on, I stamped the sentiment  Color of Winter and added the pink Snowflake Trio on each side. using my Mini Misti .  I adhered the snow bank to my card.  I stamped the  Snow Girl Waving and Snow Girl  and colored them with Copics (the snow girl waving I used, V06, V06 V17, C1, C3, C5, C7, E11, E13, and E15) (Snow Girl I used R81, R83, R85, C1, C3, C5, C7, E11, E13, and E15).  I used foam squares to them and added them to my card.  


Closer look of my card.


 If you did not know, Crackerbox & Suzy Stamp is hosting the prize for The Flower Challenge this month and if you participate in the challenge using one of the flowers from the shop tag us using #crackerboxandsuzystamps and you will be eligible for 35% off on any of the flowers in the shop.

Again check out the great promotion for the month of December, ALL STAMPS are 30% off! Stock up on those Copics you are missing and see all the lovely stencils in the shop, everything is 30% off.  Thanks for stopping by and have a great day!


December 8, 2019

Friends Are Flakes

Happy Sunday! Ericka here today with a little bit of a snarky Christmas card. I always love the unique snark Crackerbox & Suzy Stamp creates.


For my card I used the beautiful Snowflake Background.

https://rubberartstamps.com/snowflake-background/?aff=35

I started with Bristol Smooth paper and blended Distress Oxides in Peacock Feathers, Lucky Clover, and Chipped Sapphire. I then used a little water and spritzed the paper and lifted some of the ink away. Once my background was dry, I used my MISTI and stamped the background in Versamark ink and heat embossed it with WOW White Twinkle Embossing Powder. I love how delicate these snowflakes are on paper!


I stamped the fun sentiment on vellum with Versamark ink and black heat embossed it. I feel like the black embossing gives crisper lines on vellum then using Versafine ink and clear embossing powder.


I have some wooden snowflakes in my stash that I thought would work well with my card. I smooshed it on the Versmark ink pad and heat embossed it several times with WOW Aventurine Embossing Powder.


If you want more details on how I created my card, stop by my blog Strangely Creative.

Don't forget Crackerbox & Suzy Stamp is hosting the prize for The Flower Challenge this month and if you participate in the challenge using one of the flowers from the shop tag us using #crackerboxandsuzystamps and you will be eligible for 35% off on any of the flowers in the shop.

Also check out the great promotion this month. Thanks for stopping by and have a great day!

http://rubberartstamps.com?aff=35


December 3, 2019

Delft Tiles Inspired Christmas Card

Hi Everybody,

Cornelia here today with yet another Christmas card. At this point, I am looking forward making non-Christmas cards again....

I recently went on a trip to Holland and visited Delft, which is just an amazingly beautiful old town. Delft pottery and Delft tiles are famous and I wanted to recreated that on a card.


My Crackerbox Suzy supplies:

 For your details on how I made this card visit my blog HERE


And for the  last day today:

Black Friday to Cyber Monday, Nov. 29th - December 3rd will be 30% off the entire Store and free shipping for $25.00 US, and $35.00 International.

No photo description available.


And just to show you what Delft tiles might look like:


I hope you liked this!
Happy Stamping!


December 2, 2019

Snowflakes and Friendship

Hello everyone!

It's Donna here, I hope you all had a wonderful Thanksgiving!  I am featuring a couple of stamps which are Snowflake Large and the sentiment is called Snowflakes and Friendship. The whole store is 30% off for today and tomorrow (Dec 2-3), so get your wish list out and shop away before the sale ends.  Free shipping with a $25 order for the US and $35 for International. 

My card is an A2 clean and simple card, I cut my first layer at 4 x 5 1/4, I used a mask and inked the center of the layer.  I then stamped the Snowflake Large image on each corner of the masked area.  I then stamped the Snowflakes and Friendship.  I added some rhinestones and nuvo drops on the image and colored in the stars with a copic marker to finish off the card.


Closer look at the card


Thank you so much for stopping by, please come back again soon for some more inspiration.

November 25, 2019

Snowman Joy with Maria Pilar

Hello everyone!
Maria Pilar here with a new very joyful Christmas card.

I used the Snowflake background with white iris embossing powder. I colored the Snowman Joy with Copics markers and then pasted with double sided foam tape to add a dimensional effect.
The Chill of Winter sentiment is stamping on vellum. I used some Nuvo cristal drops to give the final touch.

Remember our month promotion: ALL Christmas Stamps are 20% off!!! 

In addition, this week Crackerbox & Suzy Stamps will celebrate Black Friday with these fabulous promotions.

Thanks for stopping by and happy stamping!

November 23, 2019

Snowflakes of gold


Hi all! It's Giada here with a traditional Christmas card: no coloring, just ink blending and heat embossing. Gold is so cool for Christmas and it works well with blue color - even if it was hard to catch it on picture.


After blending the background to achieve an ombré look and heat embossing the snowflakes, I stamped some additional snowflakes with Tumbled Glass Distress Oxide. For more information, please visit my blog.

Supplies used:

Snowflakes by Olesya Sm.
Snowflakes by Olesya Med.

Snowflakes by Olesya Lg.


November 21, 2019

Warm Winter Wishes

Hello everyone!

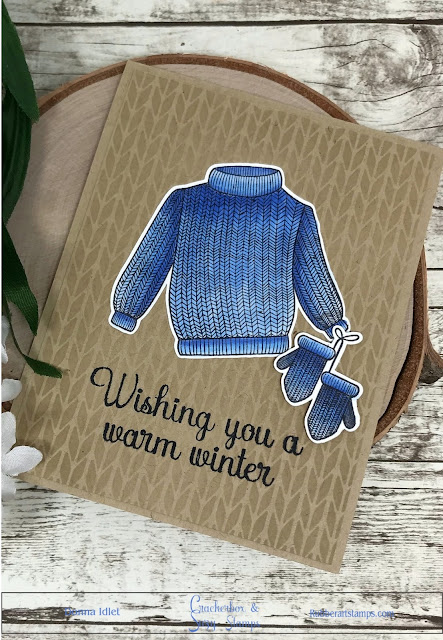
It's Donna here featuring a few rubber stamps by Crackerbox & Suzy Stamps which are Knit Sweater and Mittens set of 2 (you can also buy these separately), the sentiments are called Wishing You and Warm Winter Wishing.

My card is an A2 card, I cut my first layer at 4 x 5 1/4, I used a stencil that was in my stash to create the background. Thought this went perfect with the sweater. I then stamped the Knit Sweater and Mittens colored them with Copics and used my scan & cut to cut them. I finished the card off by stamping the sentiments Wishing You and Warm Winter Wishing, using my Misti to line the words on the card.


Closer look at my card.


Thank you so much for stopping by, please come back again soon. The promotion for the month of November is the following, you can find all the Christmas stamps here:


Please come back again soon, to see what the design team members have created.

November 10, 2019

Beginner Cardmaking Techniques - Emboss Resist

Hi everyone! It's Lindsay, from Crafting While Caffeinated Blog & YouTube Channel, here with you today to share another video tutorial! I have been making cards for 11 years now and during that time I have learned so many different techniques. And those techniques I learned so long ago, I gloss over in my videos which I know can be frustrating for beginner crafters. So today I wanted to create a video specifically for beginners all about one of my favorite techniques I use often, emboss resist! Be sure to watch the video below for all the details!!

https://youtu.be/pfgxOSM6cA0

Both of my projects today feature the same two stamps from Crackerbox & Suzy Stamps. I wanted to keep the layout of both cards pretty much identical and simple so you could really focus on the technique! Here's a look at both cards!


On my first card, I went with silver embossing powder to heat emboss with. That is another thing about this technique. You can switch up the color of embossing powder to use to create different looks! You can also switch up what medium you use for the resit. In this first project, I used dye inks.


For my second project, I switched it up a bit. I went with white embossing powder on watercolor paper. I used watercolor paper so I could then use watercolors as my resist mediums. Arteza Brush markers are what I used!


Before I go, I want to remind you that for the remainder of November all of the Christmas stamps from Crackerbox & Suzy Stamps are 20% off! So grab any that are on your wishlist or catch your eye while they're on sale!


If you are interested in the stamps I used on my projects today you can find them linked down below! Until next time, happy crafting!!

**Affiliate links are used at no additional cost to you

November 5, 2019

Coffee Stamps for Christmas

Hi friends, Martha Lucia here with you!
Today I want to share a Coffee Stamp  for Christmas that have Crackerbox & Suzy Stamps. I am featuring the Holly Branch with the Snowman Cup .


The base of my card is Real Red card stock and I just cut the second layer using whisper white card stock. I first the Holly Branch using Memento Tuxedo Black Ink and then I resized the layer using one embossed edge rectangle die from Kat Scrappines. I colored the holly branch with Spectrum Noir Illustrator Markers.


In a separate piece of whisper white card stock, I stamped the Snowman Cup and colored it with Spectrum Noir Illustrators. and fussy cut it with scissors. I arranged it on the lower part of the Holly Brunch and pasted with double sided foam tape. As final touch a few sponging of Baby Blue Harmony Water Reactive Dye Ink from Spectrum Noir in the top of card.
  Coffee Stamp for ChristmasCoffee Stamp for Christmas

Right now the stamps that I used on this card, Holly Brunch and Snowman Cup are included on the current promotions of Crackerbox & Suzy Stamps. All the Drink images are 25% OFF and all the Christmas are 20%OFF.

November 2, 2019

Warm Winter Wishes

Hello everyone!

It's Donna here playing along with the 2019 Fall/Winter Coffee Lovers Blog Hop!  Crackerbox & Suzy Stamps is a Super Sponsor for the Coffee Lovers Blog.  During the Hop, November 1-8, all drink related stamps here are 25% off.

Here is my card for your inspiration.


Here is how I created my card:

I used a stencil to create the background of my card, I am using the Crackerbox & Suzy Stamp "Coffee Cup top view", the image inside the cup is "Warm Wishes with Flake". I colored the cup using Copics and added the sentiment inside. I finished the card off by adding sequins.

Here is a closer look.


Thank you so much for stopping by, don't forget to join the Fall/Winter Coffee Lover's Hop for a chance to win some great prizes.

The promotion for the month of November is all Christmas Stamps are 20% off! Happy Shopping

October 20, 2019

6 Ways to Add Snow Effects to Handmade Cards

Hi everyone! It's Lindsay here from Crafting While Caffeinated Blog and YouTube Channel and I am super excited to share another video tutorial with you today! Today's tutorial is all about adding snow effects to your winter cards and with winter approaching, it is just in time! Watch the video tutorial to see all the different ways you can add snow effects to your own projects!

https://youtu.be/jJlzo-1k6AY

There are so many ways to add snow effects to your cards and they each give a different result. Choosing which one is right is all about the look you're going for, how much dimension you want, and honestly how much time you have. Some of these techniques take a little longer and have dry time, others are super quick.


On my first project I started by using white space and ink blending, the simplest of the techniques. Also, with using white space, shading can go a long way!


On this card I also used heat embossing, specifically with white embossing powder, which adds a nice snow effect!


For the second project I started adding snow effects with the Marvy Snow Marker. This is such a fun way to add snow" and dimension! Be sure to watch the video to see exactly how to use this product.


Also on this project I used a new to me technique that I seen on Jennifer McGuire's Channel and I wanted to see if I could get it to work for me! I used more embossing powder, but I put it in a laminating pouch and ran it through my laminator. This added a nice snow fall to the front of any scene!


My third and final project is probably my favorite. The first way I added "snow" was with adhesive sheets and craft snow. This is such an easy way to add texture to your card as well!


Aside from the Marvy Snow Marker there is another product that does the exact same thing, but that I like even better - it's just not as well known. It's called Amplify and it's from Imagine. This comes in a variety of colors, but I really love the white! This works exactly the same as the marker, but it's more white and has a lot more dimension. I also like the applicator more! Be sure to watch the video above for tips and tricks on using this product!


And the final way I added snow to my cards was with Modeling Paste, specifically Light & Fluffy Modeling Paste. I added ine through a stencil, but you can easily add this with just a palette knife straight to the cardstock. Also, try adding heat to it as well! It will puff up and add even more dimension!


Before I go, I want to remind you of a few sales that are happening over at the Crackerbox & Suzy Stamps shop. First, alot of the stamps I used today are on sale right now! All stamps in the Christmas category are 20% off for the remainder of the month, so grab any that are on your wish list or have caught your eye now!
Click here to go shopping!!


Also, for the rest of this month the new release category is on sale!
Click here to go shopping!!


I hope you all enjoyed a look all the different ways you can add snow effects to your projects this winter season! If you have any ideas that I didn't share, be sure to leave them down in the comments below!

If you are interested in any of the stamps I used today, you can find them all listed and linked down below! Until next time, happy crafting everyone!!