Showing posts with label DT - Ericka Strange. Show all posts

March 19, 2022

Easter Cross Card

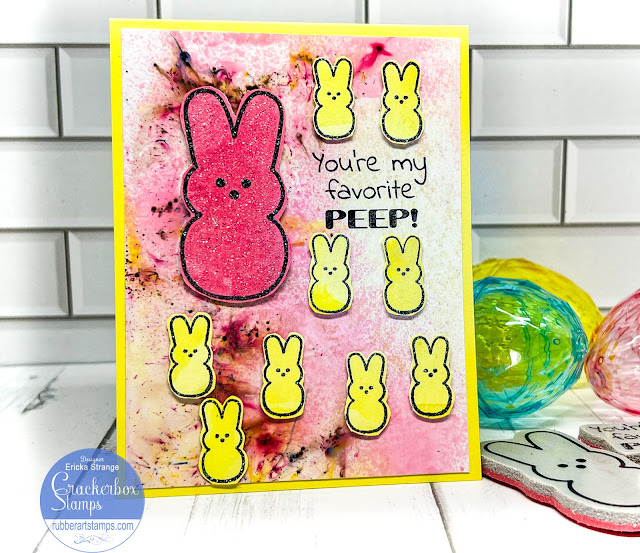
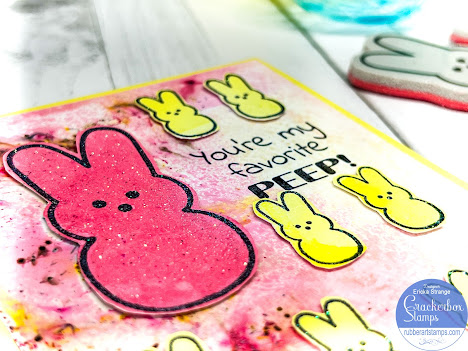
Hello friends! Ericka here and today I have a super easy Easter card with the pretty Cross Lilies stamp. To create my card, I started with a photo paper background I had previously made using Distress Oxide Reinkers. I put the re-inkers on my craft mat, spritzed them with water, and drug my photo paper through the ink. Once the ink was dry, I used a soft cloth and wiped away the oxide to reveal a vivid background.


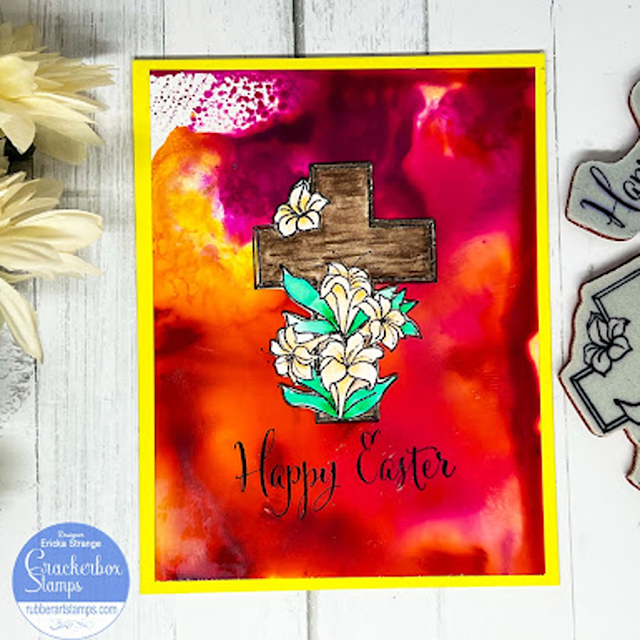
I stamped the Cross Lilies on Bristol Smooth paper and then used Zig Real Brush Markers to color up the image. I fussy cut my cross out and applied it to my background with foam tape to give it some dimension.


I finished my card by stamping the Happy Easter sentiment with black ink.
Thank you for stopping by and I hope you have a wonderful weekend and have a chance to craft something fun!

March 8, 2022

Easter Peeps Card

I hope you are all having a wonderful day. Ericka here with a fun Peep card using some of the new release Easter stamps. I love a fun sentiment and this was is great, especially for those who love the sugary marshmallow yumminess of peeps.

I started by creating my card with a photo paper background I had made using some watercolor powders and Shimmerz sprays. I then stamped the Peeps set of 2 and sprayed them with some shimmers sprays and cut them out. For my main peep, I used Disco WOW! Embossing Powder to give it a pink sugary look.

I stamped my fun Favorite Peeps sentiment in black and arranged my peeps around it using foam tape. This was such a fun and easy card to make. I hope it inspired you to make some fun Easter cards to share. Don't forget to check out the Easter sale going on now until the 13th. 

Here are a couple more cards I made with this release.

Stamps Used - Bunny Butt and Does This Tail or buy them as a set here

March 4, 2022

Easter Card Inspiration Using Our New Stamps

 We just released several new Easter stamps and a few other stamps too!
You can see all of our new stamps HERE.

PLUS all of our previously released Easter stamps are 30% OFF until March 13th @ midnight.


Below is some inspiration from our design team using our new Easter stamps.
Make sure to visit our store to see all of our Easter stamps.

Card by Vicky Briggs
Stamps Used: Stuart, Bunny Ears, Hippety Whatever

Card by Nadine Carlier
Stamps Used: Bunny Ears, Bunny Butt, If You See Bunny, Eggs Decorated

Card by Cornelia Wenokor
Stamps Used: Bunny Standing, Carrots, Easter Egg, Hippety Whatever

Card by Ericka Strange
Stamps Used: Tail Look Big Saying & Bunny Butt Set

Card by Shanna Slater
Stamps Used: Bunny Butt, Bunny Ears, Shake Your Cottontail

Card by Marcia Caradinta
Stamps Used: Bunny Ears, Hoppy Easter Every Bunny

Card by Martha Lucia Gomez
Stamps Used: Bunny Ears, Carrots, Standing Bunny, Bunny Hugs

To see ALL of our Easter Stamps click HERE

March 1, 2022

Never Too Late Snarky Card

Happy March! Ericka here and I hope you are all doing well. Today I have a fun snarky card to start the month off right. I love the Never Too Late sentiment and it is perfect to make a friend smile or for a birthday card.

To create my card, I started with a gel press print I created using acrylic paint. I love the grungy unique look a gel press print creates for an interesting background. I stamped the Sharing News set with black ink and clear heat embossed it.

I then stamped the Never Too Late sentiment in embossing ink and white embossed it. I added some white gel pen highlights to the image to tie it in with the sentiment. To finish my card, I added some enamel dots. This was such an easy and fun card and the Never Too Late sentiment would go with a variety of images found in the store.

Thanks for stopping by and I hope you have a wonderful week!

February 27, 2022

Friends Are 4 Leaf Clovers Card

I hope you are all doing well and had a great weekend. Ericka here with a fun St. Patrick's Day card using the new Friends Saying with the 4 Leaf Clover. I love this sentiment and it's perfect for any St. Patrick Day loving friend.

 This card was fast and fun to make. I started with Bristol Smooth paper I had in my stash with some embossing paste on it. I then took Dylusions green shimmer spray and misted my paper. After my background was dry, I used the Friends Saying and stamped it in black ink.
 

I then stamped the Shamrock Open and the 4 Leaf Clover in black ink randomly on my background. I used my green sparkle pens to color in the clovers for a shimmer look. I then stamped two 4 Leaf Clover on separate paper and cut them out to attach to the background with foam tape.


Thanks for stopping by and I hope you have a great week!

February 8, 2022

St. Patrick's Day Good Luck Card

Happy February! Ericka here and I'm already preparing for St. Patrick's Day with the Crackerbox Stamps new release and some fun sentiments.  I love this fun What You Get sentiment which goes perfectly with this cute Leprechaun Sheamus.


This was a quick and fun card to make. I stamped the Leprechaun Sheamus in black ink and watercolored him up with my Zig Clean Color Brushmarkers. I also used my sparkle pen to add a little shine to his green suit and hat. 


I stamped the fun What You Get sentiment in black and added the Shamrock Open to parts of the card and added green sequins

I added this fun Happy St. Patrick's Day Shamrock sentiment on the inside of my card to finish things up.


 This was such a fun and easy card to make and perfect for anyone with a sense of humor lol. Thanks for stopping by, and I hope you have a wonderful week!
For a list of all supplies used, click HERE.

January 27, 2022

Sassy Candy Hearts Valentine's Day Card

I can't believe that it is almost February! Ericka here, and I have a colorful sassy Valentine's card using the new release. When I think of Valentines, I think of candy hearts so when I saw the Candy Hearts and Sassy Sayings, I knew I wanted to create a card for my honey.

I started by creating a background with Distress Inks in Squeezed Lemonade, Kitsch Flamingo, and Cracked Pistachio. I smooshed the ink on my craft mat and picked it up with the Bristol Smooth paper. Once it was dry, I used the same colors in the sprays and lightly misted my background.

I stamped the Candy Hearts and Sassy Sayings, Heart Candy Words (because you can't have too many candy hearts lol), and All You Need in World sentiment with black Versafine ink and heat embossed them with black powder. I then added my sentiment which I stamped on vellum, to the background. I cut out the hearts and used a blending brush in the same Distress Inks for the hearts. Then, I added them to the card using foam tape.


 This was such a fun and easy card to make. Thanks for stopping by, and I hope you have a wonderful week!
For a list of all supplies used, click HERE.

January 21, 2022

New Valentine Stamps Release

 We have some brand new Valentine's Day stamps and our designers have created some inspiration using some of them. Check out their fabulous cards below....

Card by: Nadine Carlier
Stamps Used: Candy Heart Open, Candy Heart Sweet Sayings, Happy Valentine's Day Friend Script

Card by: Vicky Briggs
Stamps Used: Frogs Are Green, Frog Laughing, Frog Being Crazy


Card by: Vicky Briggs
Stamps Used: Happy Valentine's Day Friend Script
Card by: Martha Lucia Gomez
Stamps Used: All You Need In World, Caterpillars

Card by: Marcia Caradinta
Stamps Used: All You Need In World, Big Head Ed

Card by: Marcia Caradinta
Stamps Used: Frogs Are Green, Lucy, Phil

Card by: Martha Lucia Gomez
Stamps Used: Candy Heart Open, Candy Heart Snark, Candy Heart Sassy, Candy Heart Sweet

You can shop all of our new Valentine's Day Stamps HERE

January 19, 2022

Dramatic Snarky Card

I hope you are all having a wonderful January! Ericka here, and I have a fun snarky card I made for a friend.  I love all the snarky sentiments Crackerbox Stamps offers and this one is no exception. 

I started with a background I had previously made using watercolor powders on photo paper. I love the bright dramatic look you get with the photo paper after spraying the powders with some water. Once my background was dry, I used Archival Ink to stamp the Floral Lady and the awesome Making Fun of Someone sentiment.

I added a white gel pen to the Floral Lady (don't you just love her dress) as well as the Making Fun of Someone sentiment to help it stand out from the background.

 This was such a fun and easy card to make and perfect for a friend who needs a little snark in their life. Thanks for stopping by, and I hope you have a wonderful week!
For a list of all supplies used, click HERE.

January 8, 2022

Happy Birthday Emu Popup Box Card

I hope you are all having a wonderful New Year! Ericka here, and I have a birthday card I made for a friend.  I love using this box card with pattern paper for a fun interactive birthday surprise. I thought it would be fun to have the Emu Adele popping out of my card. 

I started with a popup card and cut some fun desert pattern paper to fit the panels. Then, I stamped the Emu Adele image on a separate piece of card stock and colored her up with some Copics and a sparkle pen.

I stamped the Happy Birthday Wishing sentiment for the front of my box as the Great to Have a Friend sentiment for the back. After cutting out my images, I used double-sided tape and assembled my box, adding in my images to make a fun pop-up card.

 Thanks for stopping by, and I hope you have a wonderful week and I hope your 2022 is a great one!
For a list of all supplies used, click HERE.

December 27, 2021

Spaceman Birthday Pop Up Card

I hope you all had a wonderful Christmas! Ericka here, and I have a birthday card I made for one of my nephews, who will be celebrating his birthday in January. He loves spaceships, so I created a box card using some pattern paper in my stash along with the Spaceman, Rocket, & Moon stamps and the Out of This World Birthday, Shoot for the Moon,  and Birthday 7 sentiments.


I started with a popup card and cut some pattern paper to fit the panels. Then, I stamped the Spaceman, Rocket, & Moon images on a separate piece of card stock and colored them up with some sharpies.
 

I stamped the sentiments around my box for some fun birthday messages.


After cutting out my images, I used double-sided tape and assembled my box, adding in my images to make a fun space scene.


 Thanks for stopping by, and I hope you have a wonderful week and a very Happy New Year.
For a list of all supplies used, click HERE.

December 19, 2021

Merry Christmas, Happy New Year Card

Ericka here and I can't believe how fast December has gone. Today I have one more Christmas card using the Ornament and Pine stamp along with this great Happy, Light, Merry sentiment.


For my image, I did some no-line water coloring using my Zig Clean Color Brush markers on Bristol Smooth paper.  I stamped the Ornament and Pine image using fade-out ink and colored it up. Once it was dry, I used a sparkle pen and Glossy Accents on the ornament for some Christmas shine. I also used some Nuvo glitter drops on the berries.


I stamped the Happy, Light, Merry sentiment in black ink and attached my card to a red base to finish it off.


 Thanks for stopping by and I hope you have a wonderful week and a very Merry and Bright Christmas.

 Don't forget to check out this awesome deal:
For a list of all supplies used, click HERE

December 8, 2021

Blowing Snowflake Winter Tree Card

Happy December! Ericka here and if you are like me, your are still making and sending out your Christmas cards. No matter how early I start, it seems like I can never make enough and get them all mailed out in time. Well, today I have an easy and quick Christmas card that you can make multiples of using different colors.


I started with Bristol Smooth paper and blended Distress Oxides in Squeezed Lemonade, Peacock Feathers, and Lucky Clover. I then used my spray bottle to spritz the background and lift off some of the ink. Once my panel was dry, I stamped the Blowing Snowflake Tree and Peace sentiment and heat embossed them in gold.


I love all the Blowing Tree images and the beautiful details each of them has for the different seasons.

 Thanks for stopping by and I hope you have a wonderful week. 
For a list of all supplies used, click HERE.