Showing posts with label Birthday Cards. Show all posts

July 19, 2023

Happy Birthday Earthling Card

Hello friends! Ericka here, and today I have a fun birthday card using the Alien Funny Face along with this perfect Happy Birthday Earthling sentiment.


 I started by drawing a circle on Bristol Smooth paper and then added Lindy's Gang Outer Space Shimmer Magicals to make it look like a planet. I stamped the Alien Funny Face and clear heat embossed him, and colored him up with some Tombow Markers. After fussy cutting out my image, I stamped and clear embossed the Happy Birthday Earthling sentiment and attached my alien with foam tape. I love this fun card, and it would be perfect for anyone who loves outer space. Thank you for stopping by, and have a wonderful week!

July 17, 2023

Immature Forever Slimline Giraffe Card

 Hello! Nadine here today with an immature forever slimline giraffe card that is perfect for a birthday.


I first die cut out the card front using white cardstock and then matted it with some leaf patterned paper and then some orange patterned paper. Then using two square dies, I cut out the squares in the card front. Using another piece of white cardstock and making sure it was big enough to fit behind the two square cutouts and then lightly traced the squares onto it. Next, I stamped the Rafferty The Giraffe onto the white cardstock piece using the traced lines to gauge where to stamp him. Around the giraffe image, I ink blended some green ink and colored the giraffe with Copic Markers. Then attached the giraffe piece to the back of the card front so the giraffe was looking through the square windows and attached the entire card front to a card base. Then stamped the Immature Forever sentiment above the giraffe on the card front using green and black ink.

CRACKERBOX STAMPS USED:

OTHER CRACKERBOX PRODUCTS USED:
A2 Card & Envelope
Cardstock 80lb.

For a full list of supplies used, click HERE

July 14, 2023

Quick and Easy Harry Potter Birthday Card

Hello and welcome! This is Shanna today with a *magical* card featuring stamps from Crackerbox Stamps. I needed a birthday card for a sweet friend who also happens to love all things, Harry Potter. So it was a no-brainer when I reached for my collection of HP-inspired stamps from Crackerbox Stamps!


STAMPS USED:
Or you can view the entire Harry Potter Stamp Collection.

This card is a mini-slimline card measuring 3"x6". The background is actually a print I made after using a polka dot stencil in my stash to make a background--I spritzed the stencil with water after using it while it still had the ink on it and then pressed a piece of cardstock on it to collect the ink! I love getting two backgrounds with one stencil!


Next, I took black ink and stamped the assorted HP stamps all over the panel. My sentiment was heat embossed on a black circle die cut I cut in half and then adhered to the panel. Overall, the card came together really quick, and I couldn't be happier!

Thanks so much for joining me today--I hope to see you all again soon.
~Shanna

July 10, 2023

You Are A Sweet Thing Ice Cream Card

Hello Sweet Stamper. Vicky is here today. I have a yummy card for many occasions. A sweet thing about this card, it has stamps that are 50% OFF!


I stamped the image, Sundae With Topping, and colored it. I used brown applique for the chocolate fudge on top but didn't heat it.
I added the small cherry from Cherries set of 2. I added Yummy Word. I had some flat buttons that I added in the corner. I cut a piece of printed paper to add to the bottom and stamped Sweet Thing. I added the ribbon.

Stamps Used:
Yummy Word - 50% off
Have a great day!
Vicky

June 30, 2023

June 24, 2023

Out of This World Cards

Hello! Thanks so much for stopping by! This is Shanna from Caffeinated Craftiness, and I am excited to share a pair of cards today featuring some fabulous stamps from Crackerbox Stamps.


Ever make a background just to make a background? I wanted to watercolor one day, and I had zero ideas what I would use the finished watercolor sheet on. I played around with some metallic watercolors I have and ended up with a Galaxy-type background. I loved it and then promptly forgot about it in my background drawer! LOL. When I was sorting through things, I came across it, and inspiration struck immediately with these stamps! It was totally meant to be!

Today's cards feature the following Crackerbox Stamps:

For the first card, I used the Alien Peace, If Aliens are Smart, and Rocket stamps. I cut my background panel to 4"x 5.25" and matted it only a black A2 card base. Then I heat-embossed my sentiment in white embossing powder onto black cardstock. I used my paper trimmer to cut the right side of the sentiment at an angle for some interest. I attached the sentiment to the lower left corner of my background. The Alien Peace image was colored using Copic markers and then fussy cut it out. I adhered him to where he looked like he was standing on the sentiment strip. The Rocket was also colored with Copic markers and fussy cutout, then adhered to the upper right of the card panel. That finished off this card!
My second card is actually an infinity shaker card. Infinity shakers are made with an acetate pocket that attaches over the entire panel. I used one that fit the 4"x 5.25" background panel and was filled with some embellishments that matched my theme (stars and such). I love my focal point, though, for this card! That alien makes me giggle. I colored the Alien Funny Face and Moon Full stamps with my Copic markers and fussy cut them both out. I layered them in the center of my panel and used a strong wet adhesive to attach them to the center of my shaker panel. My sentiment was heat embossed onto black cardstock and cut into a strip that matched the width of the shaker panel--4.25". I glued the sentiment strip directly onto the shaker panel as well, also hiding the raw edge of the alien at the same time!
That finishes up my post for today! I hope this inspires you to dig through your scraps or unused background and create!

Until next time,
Shanna

June 22, 2023

Pocket Gift Card Holder Birthday Card

 Hello! Nadine here today with a pocket gift card holder birthday card.


I first stamped the Pocket stamp and then stamped the Cherries on the pocket and colored them all with Copic Markers. On the stitching on the pocket, I used a gold colored pencil. Once colored, I fussy cut out the pocket and applied a liquid adhesive to the bottom edge and side edges of the pocket, leaving the top open so I could slide a gift card into it. For the sentiment, I stamped My Sweet Friend along the top of the card front. Then matted the card front with red cardstock and adhered it to the card base.


CRACKERBOX STAMPS USED:
Pocket
Cherries
My Sweet Friend

OTHER CRACKERBOX PRODUCTS USED:
A2 Card & Envelope
Cardstock 80lb.

For a full list of supplies used, click HERE

June 20, 2023

June 16, 2023

Beautiful Lady Birthday Card

Hello Stamper Friends. Vicky is here today to share a birthday card using one of the ladies that are on sale for 50% OFF!
This stamp is called Women's Back, and isn't she elegant? I used printed card stock for the background. I stamped her on cardstock and then cut her out with a die. I added pearls to match the center of the flower. I stamped Happy Birthday from the Tiny Words Set 2

Thanks for taking a look.
Hugs, Vicky

June 12, 2023

Masculine Birthday Card by Martha Lucia

Hello there, Martha Lucia here to share a stamped birthday card featuring the Olesya's Car, the Shoe Prints, and the sentiment Know You're Getting.


On this card, I stamped all the images in the same layer. First, I created the card base using real red card stock. Then on a piece of smooth white cardstock, I stamped the Shoe Prints on the left side of the panel using the double stamping technique to obtain different shadows. Then, I stamped the Olesya's Car and colored it with alcohol markers from Spectrum Noir.
On the lower part, I stamped the Know You're Getting sentiment, but this time using a different color of ink, not just black.

STAMPS USED:

Thanks for stopping by, and see you soon with more inspiration!
Martha Lucia

June 6, 2023

You're A Classic Birthday Card

Hello! Nadine here today with a masculine classic car birthday card. 

This was a quick and easy card to make, with very little coloring needed. I first die cut out a circle in a brown piece of cardstock for my card front. Then I embossed it with a wood plank embossing folder. Laying the card front piece on my card base and lightly traced the cutout circle onto the white card base so I could see where the circle would be. Then I stamped the Woody and the You're A Classic sentiment in the center of the circle and colored them with Copic Markers. On the embossed card front, I lightly sanded the raised embossed areas so they were a lighter brown and adhered to my card base with foam tape.

CRACKERBOX STAMPS USED:
Woody
You're A Classic
OTHER CRACKERBOX PRODUCTS USED:
A2 Card & Envelope
Cardstock 80lb.


There are currently more than 100 specially selected stamps that are available at a 50% discount! Please note that there is a limited quantity available for each stamp at this incredible price. Once they sell out, they will return to their original price. Additionally, new stamps are being added as the current ones sell out, so it's a good idea to check back frequently.

May 29, 2023

Minion Belated Birthday Card

Hi Everybody! Cornelia here today with my Crackerbox Stamps post for this week. Kept it CAS here.


I stamped the Minion and the sentiment onto my card. Colored the minion with alcohol ink markers. Added a strip of scrap paper and enamel dots for more interest.

STAMPS USED:

I hope you liked my card. Thanks for visiting!
Happy Stamping!

May 24, 2023

Birthday Mini Slimline Butterfly Shaker Card

 Hello! Thank you so much for dropping by!  This is Shanna with Caffeinated Craftiness and I have a fun birthday shaker card featuring stamps from Crackerbox Stamps.


I had a lot of fun making this quick and easy shaker card!  I used the following stamps from Crackerbox stamps in today's project:

Butterflies Solid - set of 2

--or available separately--

Butterflies Solid: small or large

It's Your Birthday


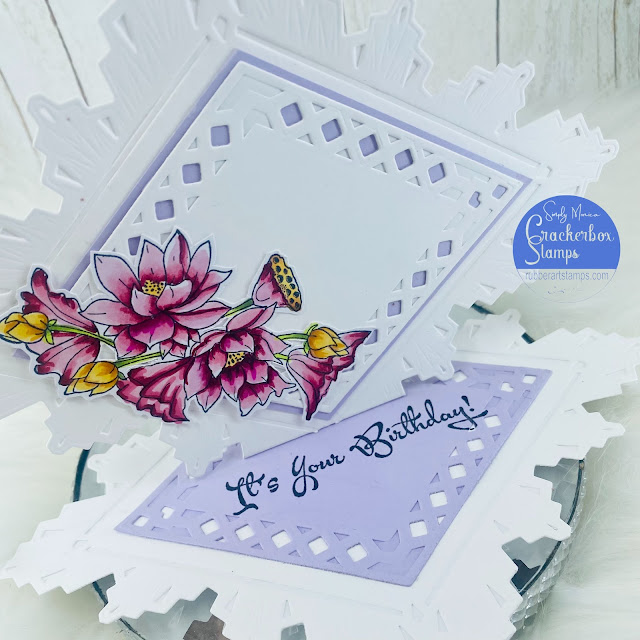
I started out my card today with a mini slimline sized panel that I had leftover from a gel press session I had done previously.  I love creating multiple gel prints when I create with a gel press and this is exactly why---quick and ready to go panels!!  I used the Butterfly Solid stamps and stamped them all over the background using a gray ink.  

Next I grabbed a scalloped frame die from my stash and diet a frame out of black cardstock and set it aside.  For my window I used heat resistant acetate.  That means I was able to stamp and heat emboss on the acetate without warping/melting it--total game changer!  I stamped the It's Your Birthday sentiment in embossing ink onto a piece of the acetate cut to the same size as my frame and then heat embossed with black embossing powder.  Once cooled, I adhered the acetate piece to the black scalloped frame.

For the shaker bits I added a variety of flat sequins from my stash and then attached the frame window to the card base, over the sequins, using a double thick foam tape.  The entire shaker panel was mounted to a white card base to finish off the card.

I love creating shaker cards, I feel like they are a unique and fun card both to give and to receive!  Do you like making shakers?  

Thank you so much for stopping by today, I hope you enjoyed my project.  Be sure to check out my personal blog Caffeinated Craftiness, or follow me over on my Instagram for all of my caffeinated adventures!

See you all again soon,

Shanna

May 20, 2023

Another Year Down The Drain Birthday Card

Hi there! Vicky here today with some birthday toilet humor.


I drew the squares and colored them in. I used printed card stock for wallpaper.
I placed the toilet on some cardstock to see where the Toilet Roll would go. I removed the toilet, and I stamped the Toilet Roll and, masked it, then stamped the Toilet and added shading.
I stamped Plunger and colored it. The Toilet Roll and Plunger is a set.
I stamped Birthday 8. I cut out all of the stamped images.


I stamped Another Year Down The Drain on the inside.
Hope you enjoyed the card.

Stamps Used:

Have a wonderful day! Thanks for taking a look.

May 18, 2023

Happy Birthday Guardians of the Galaxy Card

 Hello crafty friends! Tracy here, and today I wanted to share a card featuring one of my favorite characters...Rocket, from Guardians of the Galaxy. With Volume 3 of the franchise out now, I thought it would be fun to create. Here are all of the details.


Cut a piece of white cardstock for your card front. Then do a simple blend with Wilted Violet first, then with Blueprint Sketch just around the edges. Next, using Elegant Eggplant ink, add stars around the border of the card front. 
Add the sentiment onto the bottom of the card front using black ink. Adhere the card front onto the white cardstock card base. Stamp Rocket onto white cardstock and add color to the image using Nuvo Markers. Fussy cut out the image and then added it to the card front using foam squares. The final touch is to add Stickles to the stars around the border of the card front.

Crackerbox Stamps Used:

Thanks so much for stopping by!

May 11, 2023

Snarky Birthday Card

 Hello friends, Ericka here, and today I'm playing with the sentiment Fall Down which is perfect for a birthday card.

This makes me laugh so much, and I thought it would be fun to make a birthday card for my husband on his birthday tomorrow. I stamped the sentiment, and white heat embossed it. I also stamped the Wink stamp and clear heat embossed her after coloring her up. The clear embossing acts as a resist, so when I used the Distress Ink, it would resist the image. I used Distress Ink in Salvaged Patina, Mowed Lawn, and Uncharted Mariner on my craft mat and picked up the color for my background. After my background was dry, I used a black watercolor pencil to box the sentiment in to help it stand out.


I stamped the Birthday 6 sentiment on the inside, and white heat embossed it.  Thank you for stopping by, and I hope you have a wonderful day.

STAMPS USED:

May 7, 2023

Shaped Floral Birthday Card

Hi everyone! Welcome back to the Crackerbox Stamps blog.  Today I am sharing a fun-shaped floral card perfect for birthdays or any occasion!


To make my card, I used one of the new floral releases in April titled "Lotus" and colored it using my copic pens: R89, R85, R81, and YG01, YG17.  To make the shape, simply use one of your dies from your stash and adhere them together for a fun-shaped card!  To complete my card, I used black die ink and stamped "It's Your Birthday!" on the bottom half of the card to finish it off.


I hope everyone enjoyed my post, and thanks for stopping by!

Stamps Used:


April 30, 2023

Booze and Bad Decisions Birthday Card

 Hello crafty friends! Tracy here, and today I have a snarky little card to share. Here's to making cards to make people smile. Here are all of the details.


Crackerbox Stamps Used:

I created a simple blended background using Distress Oxide Inks and a blending brush. Then I added the sentiment to the card front using black ink in the top left-hand corner of the card.
I love using the Coffee Stain for any drink cards. So I added brown ink to the stamp, then misted it with water to give it a more watery look when stamped onto the card front. Now adhere the card front to the white cardstock card base. Stamp the beer cans and beer mug onto white cardstock, then add color to the images using Zig Clean Color Markers and a water brush. Fussy cut out all of the images and added them to the card front using foam adhesive. Then I added Stickles to the beer mug for a little sparkle on the card. Let dry completely.

Thanks so much for stopping by!
Tracy

April 22, 2023

We Still Rock Birthday Card

 Hello! Nadine here today with a birthday card using some stamps from the Remember the 60s category in the store.

Using a piece of 80lb. White Cardstock, I stamped the We Still Rock sentiment with VersaFine Clair in Nocturne and added some pink embossing powder just to the "We still rock!" part of the stamp and heat set it with a heat tool. Then just below the sentiment, I stamped the Girls Boombox and colored it with a pink and grey Copic Marker. On my card front, I used some patterned papers I had in my stash.

CRACKERBOX STAMPS PRODUCTS USED:
80lb. White Cardstock
We Still Rock
Girls Boombox

For a full list of supplies used, click HERE
See you next time! Until then, happy crafting!

April 6, 2023

The Older I Get Masculine Golf Card

 Hello! Nadine here, and today I am sharing a humorous masculine golf card that can be sent as a birthday card.

I used several Crackerbox Stamps on my card. I first stamped the Golf Swing Guy and colored him in with Copic Markers. Then I stamped the Golf Swing guy on some masking paper, fussy cut it out, and placed it over the colored image on the front of my card. Then I stamped the Grass along the bottom using some green ink and the Golf Ball and Tee. Next, I stamped the Golf Green and the Older I Get sentiment. I then used my Copic Markers and airbrush machine on the background of my card to color in the Golf Green and around it.

STAMPS USED:
Older I Get
Golf Swing Guy 
Grass
Golf Ball and Tee
Golf Green
For a full list of supplies used, click HERE.

See you next time! Until then, happy crafting!