Showing posts with label DT - Shanna Slater. Show all posts

September 3, 2024

Minion Mischief and Easy Card Backgrounds

 Hello and welcome!  This is Shanna today for Crackerbox Stamps  and I have a brand new card featuring our favorite yellow-banana loving- mischeif makers!! MINIONS!


Today's card features the following stamps:
I had a lot of fun coloring Sassy Dave and his Fart Gun!  I fussy cut them both off, cutting around Dave's arm so he could "hold" the Fsrt Gun more effectively *hehe*.  

My background was made by ink Smooshing distress oxides onto watercolor paper.  Oxides are a lot of fun for this technique because they have the ability to "layer" on top of each other since the are somewhat opaque.  The key to not having the colors overman together is allowing the colors to dry before adding one on top.  I used Squeezed Lemonade, Blueprint Sketch, and Lost Shadow to create my background.

Once the background was completely dry I heat embossed my If People are Talking sentiment and stamped the Poof onto the background panel in black and gray inks.  The focal images were added to the panel using liquid adhesive to keep it simpler to mail.  

Thanks so much for dropping by!  Be sure to return again soon for another dose of Crackerbox Stamps inspiration!

August 24, 2024

Harry Potter all squared up!

 Hello!  This is Shanna, and I am here today with a fun Harry Potter card featuring some brand-new polymer stamp sets from Crackerbox Stamps!

Today's card features stamps from the following stamp sets:
Harry P 1
Harry P 2

These sets are so MAGICAL and obviously coordinate together seamlessly.  I primarily pulled images from Harry P 1 and then snagged the sentiment from Harry P 2.

The card was created by making what I called "zones" for each image, or set of images I wanted to place on the card.  I kept it symmetrical and used a ruler to help balance.  It is a fun way to set up any theme on a card!

Thanks so much for joining me today. Stop by again soon for another dose of Crackerbox Stamps inspiration!!

August 14, 2024

Trick or Treat! A head start on Halloween card

 Hello and welcome!  This is Shanna today with a fun HALLOWEEN card featuring stamps from Crackerbox Stamps!  Is anyone else ready for Fall to hurry up and get here?  This California girl is ready to be d-o-n-e with the heat!  Halloween crafting is one of my favorites, so I pulled out my favorite Halloween kid stamps and had some masking fun for today's card!


I started off with my card by stamping my trick-or-treating gang using the masking technique.  To somewhat explain, you start my stamping the image you want to be "in front" of the others, and then cover it with a mask--a fussy cut removable adhesive copy--and then stamp the next images and repeat!  I have had this card in my head for a long time and was excited to see it come to life on paper!

While my masks were still applied over the images, I ink-blended my ground and sky by using masking tape to create a line to blend below and then moving it so I could blend above.  A cheap way to keep a crisp horizon line with ink blending!

After my ink blending, I removed the masks and then got to coloring with my Copics!  I love coloring, so this was right up my alley!

The card was finished by stamping the Happy Halloween sentiment onto my ground layer.

Thanks so much for stopping by!  I will see you all again soon with another Crackerbox Stamps, inspired project!  ~Shanna


July 24, 2024

Birthday Paper Busters! July 12 Sketches | 24 Cards series: PART TWO

   Hello and welcome!  This is Shanna here today, and I am excited to show you all the next installments in my 2024 12 Sketches | 24 Cards series with Crackerbox Stamps!  This month's installment is split into 2 parts for a total of FOUR cards!  Be sure to check out the post from July 20, 2024, for the initial dose of inspiration in PART ONE!


Today's cards both feature the best of both red rubber stamps and the new photopolymer stamp sets Crackerbox Stamps debuted this year!!  I used the Birthday 2 photopolymer stamp set and then also used the Beautiful, Amazing, Friend rubber stamp as well!  I love mixing and matching the clear stamps and red rubber stamps on my projects!

For this month's sketch I visited Jess Crafts blog and used one of her MANY sketches--in this case one of her 12x12 paper buster sketches.  The first two cards last week stuck pretty close to the sketch--today I am going to show you how I checnaged them a little more but still stuck to the idea of the sketch!


For my first card I used the Beautiful, Amazing, Friend  stamp and chose to stray away from my monochromatic type of tone the other three cards had with the teal ink and give art a pop of color!  I stamped the sentiment using a bright pink ink that pulled from the triangle pattern paper a little and contrasted nicely with all of the teals.  I trimmed it down not by measurements, but rather to the shape of the sentiment!  NO MATH!  I also chose not to mat this layer, and opted to drag ink across the edges to help frame it a little.  That's a quick way to help a layer not get lost on a background, and I use it frequently!

For the second card I used one of the snarky birthday sentiments from the Birthday 2 clear stamp set that totally holds its own on a card!  LOL!  I stamped it in a teal ink to match the paper's well.  I turned the sketch on to it's side for this card, and the sentiment layered right on top go the smaller top layer of the sketch!  I used the ink pad on the edges of the sentiment again to help frame it a little as well. 


Thanks so much for dropping by today--be sure to check out the links below to take a look back at the rest of the sketch series so far this year! 
Take a look at previous posts in this series here:


July 20, 2024

Birthday Paper Busters! July 12 Sketches | 24 Cards series: PART ONE

  Hello and welcome!  This is Shanna here today and I am excited to show you all the next installment in my 2024 12 Sketches | 24 Cards series with Crackerbox Stamps!  This month's installment is split into 2 parts for a total of FOUR cards!  Be sure to check back on July 24th for more inspiration!

Today's cards both feature the best of both (stamping) worlds!!  I used the Birthday 2 photopolymer stamp set and then also used Happy Birthday Vertical rubber stamp as well!  I love mixing and matching the clear stamps and red rubber stamps on my projects!

For this month's sketch I visited Jess Crafts blog and used one of her MANY sketches--in this case one of her 12x12 paper buster sketches.  I tend to hoard 12x12 paper--espeically pretty paper I think is too pretty to cut up!  This sketch let me use one of those pieces to make FOUR cards in total with zero waste.  I was thrilled to be able to show off th beautiful floral paper as well as the stamps too!

The sketch itself is pretty straight forward, and the measurements are included for cutting.  I shifted the middle layer towards to left of my cards rather than the center as a preference, but all in all I love how these turned out!!

For the first card I combined the cake and Happy birthday sentiment from the Birthday 2 clear stamp set and stamped them in a teal ink to match the paper.  I also added some stickies to the cake's frosting for some sparkle!


For my second card I added the Happy Birthday Vertical red rubber stamp centered down across the middle panel.  I chose to mat it in the same way the other layers were matted to tie it all together and ground it a little in the design.  


Thanks so much for dropping by today--be sure to check out the links below to take a look back at the rest of the sketch series so far this year! 
Take a look at previous posts in this series here:


July 14, 2024

Retro 80s Neon Birthday Card

 Hello and welcome!  This is Shanna today with a quick card featuring one of my favorite birthday sentiments from Crackerbox Stamps!


Todays projects features the  Beautiful, Amazing Friends Stamp.

This card is one of the EASIEST to do—just grab some ink pads, in my case I grabbed my collection of neon ink pads—and then mask off a stripe using some masking tape down the side of your card panel!  After you have the area masked, drag the various ink pads directly over the paper. I love the sketchy vibes this technique gives!!  Remove the tape after you are done and then you are good to position the sentiment and stamp with your favorite black ink!


I added a little bit of sparkle with some rhinestones in the rainbow of colors, scattering them around the different sections of colors. 

Thank you so much for dropping by today—see you all again soon!
-Shanna


June 24, 2024

UnFROGettable June 12 Sketches | 24 Cards series

 Hello and welcome!  This is Shanna here today and I am excited to show you all the next installment in my 2024 12 Sketches | 24 Cards series with Crackerbox Stamps!  

Today's cards both feature the new photopolymer Frogs Set 1 stamp set and the following sketch that I found on Pinterest.
This month I decided to show you how I can use a sketch concept in it's literal sense---and how I might turn a sketch into a fun fold card too!
Here is my first card, which is a conventional A2 top folding note card that I modeled after the sketch using some pattern paper in my stash and Frog Set 1.
I kept this design pretty simple and chose not to color at all--rather I heat embossed my frog and my sentiment onto the green pattern paper with some black embossing powder.  I love the texture you get with heat embossing!
For my second card--I transformed the sketch into a fin fold by making a gate gold card instead of a folded notecard like card 1 was.  I split the cardstock between the top and bottom sections, and then added the top but only adhered it to the top "flap".  It created a vertical gatefold card that is SO FUN!  

I was even able to hide my sentiment under the frog layer!
Thanks so much for dropping by today--be sure to check out the links below to take a look back at the rest of the sketch series so far this year! 
Take a look at previous posts in this series here:


June 22, 2024

Where's My Spoon?? CAS Coffee Card

 Hello again!  This is Shanna here today with a fabulous caffeinated project featuring Crackerbox Stamps!  Today's card is a quick and simple coffee card that you can whip up in no time!

This card comes together with a simple comic colored focal image, using the large to-go cup from Coffee Set 1  and adding a lightly textured background in a similar color pathway using ANY stencil!  I lightly added some yellow inked stenciling behind the coffee cup and then added the sentiment from Coffee Set 2  and the spoon to finish off the card!  

Today's project features the following stamps:
Coffee Set 1 photopolymer stamp set
Coffee Set 2 photopolymer stamp set

I like quick and easy cards, don't you?  Be sure to check back soon for some more inspiration!
Take care and stay crafty! ~Shanna

June 14, 2024

Cluck It! Gatefold Card with a Twist


Hello and Welcome!  This is Shanna today with a brand new fun-fold card featuring Crackerbox Stamps! 

Today's card features the following stamps:

Miss Prissy photopolymer stamp set


So let's take a peek at today's project! Here is the front of the card.  This card is what is known as a gatefold card--meaning the opening is in the center of the front--like a "gate".  I used patterned paper from an old 6x6 pad in my stash to decorate the panels, and my focal point actually slides off to allow the recipient to open the card.


Here is the inside.  I kept the design rustic with a white panel that I inked up in some Distress Oxide ink (Vintage Photo if you are curious lol) and then stamped Miss Prissy in the lower left corner with a second sentiment from the set.


Let's take a closer look at the "slide lock" component of my card.  This is created by using a diet shape--in this case a scalloped circle--and then attaching a "lock" component. I decorated the circle by stamping Miss Prissy  and the feathers in a pale brown ink and then stamped the sentiment over all of it in a darker brown ink.  The lock component is composed of 3 identical square, two of which are scored down the middle and then adhered next to each other on the third.  The picture might explain this better than my words though LOL.  The key is to make sure your squares are smaller than your diet piece so they don't show on the design.


Thank you so much for stopping by!  I hope you all are having a fabulous start of Summer (or whatever season it is in your neck of the world). I will see you all again soon with another Crackerbox Stamps inspired project.  Until then--BYE!
~Shanna


May 14, 2024

Break The Rules -- Unexpected Use of Scraps Card

 Hello!  This is Shanna with another fun card featuring products from Crackerbox Stamps!
Ever have a vision for a card, and halfway through, something changes your direction?  That was this card for me!  

Today's card features the following stamps:

I started out by stamping and coloring the Rosie stamp and die cutting her out with a circle die.  My original vision for the card was a "angled gatefold" card--which is a card that has angled edges on both gatefold closure panels.  I was excited!  Then the math didn't. math right for me lol--and I was left with the blue panel you see on the background of the card..  Oddly shaped, and I had no clue what to do with it!  Then I decided to see what it looked like placed on a standard A2 card panel--and this design was born.

I used the anchor stamp and white pigment ink to add a background pattern to the blue cardstock piece, and then stamped the sentiment in the lower right corner using red ink.  I popped on a few red pearl embellishments to finish it off and we were done!


I rarely throw much away--thinking I will use it *eventually* --  I was super excited to see that work out for the better today!

Thanks so much for dropping by, see you again soon! 
~Shanna

May 3, 2024

Daisy meets her Sisters - Cow Card

 Hello and welcome! This is Shanna today with a brand new card project featuring stamps from Crackerbox Stamps!

Have you seen the new clear stamp sets from Crackerbox Stamps yet?  Oh my goodness have they been fun to create with!  One of the newest additions is Miss Daisy — and you cannot help but smile when you see that cow!! 


Today’s project features the following stamps:
Miss Daisy  Stamp set

I knew when I saw the new Daisy set that she would need to meet her sisters! BerniceBridgette, and Bella all joined the party to create my background for this card! I used my MISTI stamp positioner and black ink and stamped each cow multiple times until I had filled the panel.  Daisy was stamped in the same black ink and then die cut. I added a pop of color using Copic markers for the Glasses and a few grays for shadows. 

I am absolutely in love with this card!! Thank you so much for dropping by, I will be back soon with another Crackerbox Stamps surprise!
-Shanna


April 24, 2024

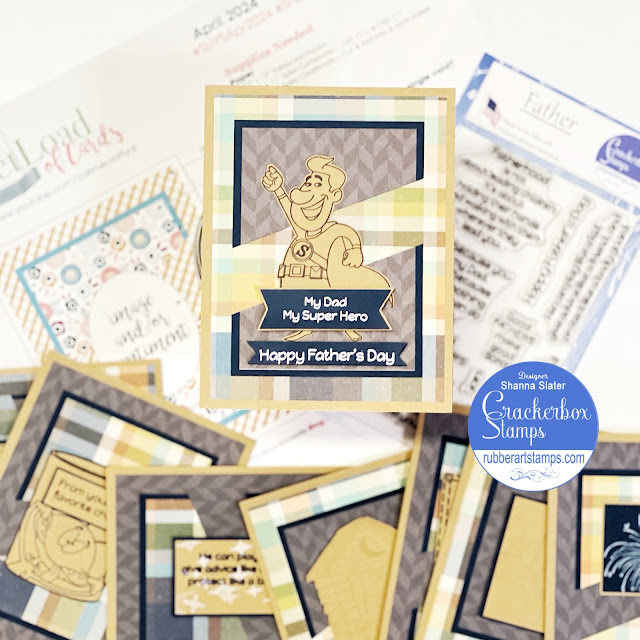
Sheetload of Father's Day Cards | 12 Sketches, 24 Cards Series

Hello and welcome!  This is Shanna today with the next installment in my 12 Sketches | 24 Cards series!  This is a series in which I select a card sketch off the internet and create TWO (well-at least two!) versions of it using Crackerbox Stamps! If this is your first time reading about this--be sure to read all the way to the end for a recap of the series so far!  

*Warning* I might have gotten a bit carried away this month, and the following post is very photo-heavy!!

This month's sketch was sourced from a YouTube creator named CraftyAl.  She creates a monthly sketch that utilizes 12x12 paper to mass produce a set of cards!  I chose to use the April 2024 sketch to play along with my challenge this month! I was inspired to use the sketch and pair it with the brand new Father clear polymer stamp set--using the majority of the seed to create a fun set of cards!

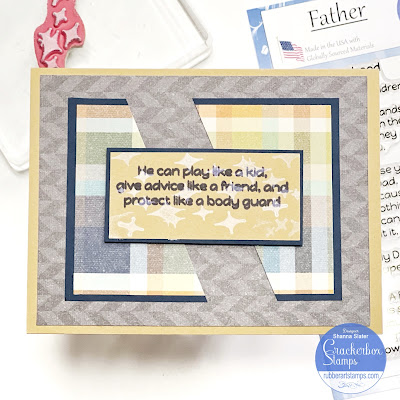
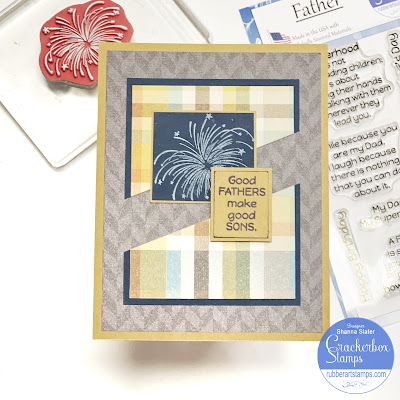
The way the sketch is designed makes it create 8 cards--which was a perfect way to showcase a new sentiment stamp set!  I loved going through my collection and pulling out stamps to match the sentiments!  I grabbed stamps I haven't used in a while and was so happy to pull back out again.  I kept the techniques simple with these--a little heat embossing and some tone on tone stamping.  

Here are some of my tips when mass producing cards:

  • Pick a color way--that means if you are using pattern paper, stick within those colors and have a stack nearby of inks and solid papers to choose from when designing the card.
  • Don't be afraid to turn the card!  Some of these sentiments or images just did not work for a portrait designed layout--so I turned it into a landscape layout instead!
  • White pigment ink is your friend!  White is neutral, and will pull into nearly ANY design--I was stuck on a card or two until I pulled my trusty white ink pad out to play!
Ok--that pretty much sums up the key points--time to show you the cards!

Super Guy with Father sentiment

Frame Rectangle with Father sentiment

When I Dunk (masked) , Alien Funny Face with Father  sentiment

Outhouse with Father  sentiment

Stars/Pixie Dust with Father sentiment

Pocket with Father sentiment

Snapdragon  with Father sentiment

Fireworks with Father sentiment

Aren't those fun!!!  I hope you enjoyed them as much as I did!!  
Thank you so much for stopping by today!  I hope you are enjoying the series so far!
You can find the monthly post linked below with the picture if you missed my previous posts.
See you all again soon! ~Shanna


Take a look at previous posts in this series here: