Showing posts with label DT - Nadine Carlier. Show all posts

August 15, 2023

Happy Haunting Graveyard Card

 Hello! Nadine here today with a happy haunting Halloween graveyard card.


I used a piece of patterned paper for the background, but you could easily recreate it by blending some green ink towards the bottom and going into black ink towards the top. Then using white cardstock, I die cut out a circle and ink blended some yellow inks and a little bit of black to give it a moon look. On the moon, I stamped the Bats Flying in Swarm onto it and then adhered the moon onto the background. Next, I stamped the Happy Haunting Drips in the top right corner with VersaFine Clair in Nocturne and heat embossed it with black embossing powder.
On a piece of white cardstock, I lightly sprayed it with gray, silver, and light blue color sprays to get a granite like look. Then I stamped the Tombstone and the Barry M. Deep with VersaFine Clair in Nocturne, heat embossed it with black embossing powder, and fussy cut it out. Then adhered to the background with the moon. Next, I stamped the Hand Out Of Dirt and colored it with Copic Markers, and fussy cut it out. At the bottom of the tombstone, I colored some brown to look like dirt and adhered the hand over the dirt area. Under the hand itself, I used one small 3D foam square, so the hand popped up some.

CRACKERBOX STAMPS USED:

OTHER CRACKERBOX PRODUCTS USED:

For a full list of supplies used, click HERE

August 11, 2023

Witch's Hat Tent Fold Card

 Hello! Nadine here today with a witches hat tent fold card.
It's not too early for Halloween cards, is it? Nah!!


This was a fun card to make. I first made my card base by cutting a black piece of cardstock at 4¼" x 11" and folding it in half. Then using green cardstock, I cut it at 10" x 4" and scored and folded it at 5¼" x 7⅝". Then I attached the 5¼" section of the green cardstock to half of the black cardstock piece.


On some white cardstock, I stamped the Witch's Boots and Spider Spooky and colored the boots and leggings with Copic Markers. Attached it to some spider web patterned paper and then attached it to the card base. On the front fold, I cut a piece of the patterned paper to fit it and then stamped the Somedays sentiment on white cardstock and cut it to fit into the middle of the front fold piece. Then I stamped the Witch's Hat, colored it with Copic Markers and fussy cut it out, and attached it to the top of the front fold.


When the card is folded up, it fits perfectly into an A2-size envelope.


CRACKERBOX STAMPS USED:

OTHER CRACKERBOX PRODUCTS USED:

For a full list of supplies used, click HERE

August 6, 2023

25 Again Fish Bowl Birthday Card

Hello! Nadine here today with a fun fish bowl birthday card.


I first stamped the Fish Bowl and then stamped the Bernice Angel Fish inside the bowl. Then I stamped the Dot Splatters in blue ink to make them look like bubbles coming from the fish. I then colored all the images with Copic Markers and then fussy cut out the fish bowl.
Next, I stamped the 25 Again sentiment on a piece of white cardstock for my card front. Then using an embossing folder, I embossed the card's front piece and lightly ran some champagne colored metallic ink over the raised embossed areas. Matted the card front with some orange cardstock and adhered it to my card base, and added the fishbowl just below the sentiment.


On the inside of the card, I stamped the Happy Birthday Open sentiment and colored it with Copic Markers.

CRACKERBOX STAMPS USED:

OTHER CRACKERBOX PRODUCTS USED:
A2 Card & Envelope
Cardstock 80lb.

For a full list of supplies used, click HERE

July 22, 2023

Funny Shark Card

Hello! Nadine here today, and with shark week starting, I thought it was a great time to create a shark card.


I stamped all the images: Clyde the Shark and the Seaweed Tall and Coral Sea Plant, the Fish School, and the What Doesn't Kill You sentiment. I then masked the shark with masking paper, and using an airbrush and Copic Markers, I created the ocean floor and water in the background. Then I removed the masking from the shark and colored all the images with Copic Markers.

CRACKERBOX STAMPS USED:

OTHER CRACKERBOX PRODUCTS USED:
A2 Card & Envelope
Cardstock 80lb.

For a full list of supplies used, click HERE

July 17, 2023

Immature Forever Slimline Giraffe Card

 Hello! Nadine here today with an immature forever slimline giraffe card that is perfect for a birthday.


I first die cut out the card front using white cardstock and then matted it with some leaf patterned paper and then some orange patterned paper. Then using two square dies, I cut out the squares in the card front. Using another piece of white cardstock and making sure it was big enough to fit behind the two square cutouts and then lightly traced the squares onto it. Next, I stamped the Rafferty The Giraffe onto the white cardstock piece using the traced lines to gauge where to stamp him. Around the giraffe image, I ink blended some green ink and colored the giraffe with Copic Markers. Then attached the giraffe piece to the back of the card front so the giraffe was looking through the square windows and attached the entire card front to a card base. Then stamped the Immature Forever sentiment above the giraffe on the card front using green and black ink.

CRACKERBOX STAMPS USED:

OTHER CRACKERBOX PRODUCTS USED:
A2 Card & Envelope
Cardstock 80lb.

For a full list of supplies used, click HERE

July 16, 2023

A Little Crazy Hyena Card

 Hello! Nadine here today with a crazy hyena card.


I created my background by using a stencil and a blending brush with some yellow inks. Then I stamped the You Should Always Crazy sentiment and also the Psycho Hyena Critter over the stenciled background. I then stamped the Psycho Hyena Critter again on a piece of white cardstock and colored him with Copic Markers. Then fussy cut him out and adhered him over the image I stamped on the background. I did this so the little strands of hair on his head would show after I fussy cut him out. With a light gray Copic Marker, I added some shadows around his feet for some dimension.

CRACKERBOX STAMPS USED:

OTHER CRACKERBOX PRODUCTS USED:
A2 Card & Envelope
Cardstock 80lb.

For a full list of supplies used, click HERE

July 6, 2023

Welcome Baby Card

 Hello! Nadine here today with a super cute welcome baby card.

I first started by creating the background for my card by spraying blue color sprays on some bubble wrap and then placing the card front down onto the bubble wrap.

Then I stamped the Large & Small Ducky and colored them in with Copic Markers, and fussy cut them out. Next, I stamped the Welcome Baby sentiment and cut it into a banner shape. Then adhered the ducks and the sentiment with some 3D foam squares. Matted the card front with some yellow cardstock and adhered it to the card base.

CRACKERBOX STAMPS USED:
Ducky Lg. & Sm.
Welcome Baby

OTHER CRACKERBOX PRODUCTS USED:
A2 Card & Envelope
Cardstock 80lb.

June 22, 2023

Pocket Gift Card Holder Birthday Card

 Hello! Nadine here today with a pocket gift card holder birthday card.


I first stamped the Pocket stamp and then stamped the Cherries on the pocket and colored them all with Copic Markers. On the stitching on the pocket, I used a gold colored pencil. Once colored, I fussy cut out the pocket and applied a liquid adhesive to the bottom edge and side edges of the pocket, leaving the top open so I could slide a gift card into it. For the sentiment, I stamped My Sweet Friend along the top of the card front. Then matted the card front with red cardstock and adhered it to the card base.


CRACKERBOX STAMPS USED:
Pocket
Cherries
My Sweet Friend

OTHER CRACKERBOX PRODUCTS USED:
A2 Card & Envelope
Cardstock 80lb.

For a full list of supplies used, click HERE

June 15, 2023

Funny Frog Card With Stamp Layering

 Hello! Nadine here today with a funny frog card.

To create my card, I used several stamps and layered them up using masking paper. First, I stamped the Frog with Fly on a white cardstock card front. I then stamped it again on some masking paper and fussy cut it out, and layered the masking paper over the frog. Next, I stamped the Lily Pad over the masked frog and then stamped the lily again on some masking paper, fussy cut it out, and masked off the lily too. With the frog and lily still masked, I then stamped the Cattails on either side of the lily. Then masked the Cattails off. Then, I stamped the Frog's Fly with the OMG! and the Frogs Are Lucky sentiment. I also masked off the Frog's Fly. So all the stamp images were masked off except for the words.

Next, I used a strip of masking tape about at the same level as the frog's head, and below it I ink blended some blue ink for water. I then removed the masking strip but still left all the stamp images masked. I used a cloud stencil and some blue and grey inks to create a sky by ink blending. Then I lightly misted the ink blending with water, and placed a paper towel over it to soak up the water. This gave it a watercolor look. Once dry, I removed all the masking paper off all the images and colored them in with Copic Markers.

CRACKERBOX STAMPS USED:
Frog with Fly
Lily Pad
Cattails
Lily Pad & Cattail Set
Frog's Fly
OMG!
Frogs Are Lucky

OTHER CRACKERBOX PRODUCTS USED:
A2 Card & Envelope
Cardstock 80lb.

For a full list of supplies used, click HERE
See you next time! Until then, happy crafting!

June 6, 2023

You're A Classic Birthday Card

Hello! Nadine here today with a masculine classic car birthday card. 

This was a quick and easy card to make, with very little coloring needed. I first die cut out a circle in a brown piece of cardstock for my card front. Then I embossed it with a wood plank embossing folder. Laying the card front piece on my card base and lightly traced the cutout circle onto the white card base so I could see where the circle would be. Then I stamped the Woody and the You're A Classic sentiment in the center of the circle and colored them with Copic Markers. On the embossed card front, I lightly sanded the raised embossed areas so they were a lighter brown and adhered to my card base with foam tape.

CRACKERBOX STAMPS USED:
Woody
You're A Classic
OTHER CRACKERBOX PRODUCTS USED:
A2 Card & Envelope
Cardstock 80lb.


There are currently more than 100 specially selected stamps that are available at a 50% discount! Please note that there is a limited quantity available for each stamp at this incredible price. Once they sell out, they will return to their original price. Additionally, new stamps are being added as the current ones sell out, so it's a good idea to check back frequently.

May 22, 2023

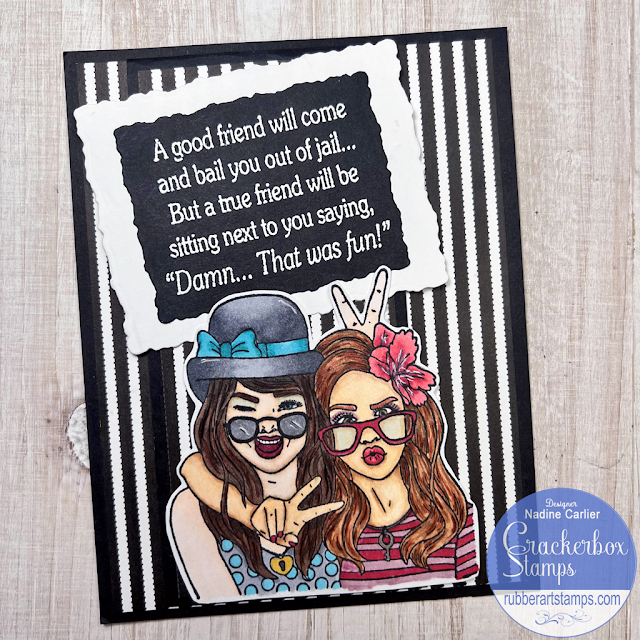
Funny True Friends Card

 Hello! Nadine here today with a funny true friends card.


I stamped the Girl Friends stamp and colored them in with Copic Markers. Then I fussy cut the girls out. Next, I stamped the Good Friend sentiment with VersaMark Ink on black cardstock and then heat embossed it with white embossing powder.

CRACKERBOX STAMPS USED:
Girl Friends
Good Friend
OTHER CRACKERBOX PRODUCTS USED:
A2 Card & Envelope
Cardstock 80lb.

May 15, 2023

Fisherman Father's Day Card

 Hello! Nadine here today with a fisherman Father's Day card.

I stamped and then colored the Fisherman with Copic Markers. Then I die-cut him out, matted him with some blue cardstock, and adhered him to the front of my card. Then I stamped the Fishing Worm On Hook and colored him in with Copic Markers, and fussy cut him out. Then adhered the worm so he looked like he was hanging from the fishing pole of the Fisherman. I used a black marker to draw the fishing line so there was no gap between the hook and line and the pole line. For the sentiment, I used Fishing Problem, and for the inside of my card, I used Father's Day Freehand.

CRACKERBOX STAMPS USED:
Fisherman
Fishing Worm On Hook
Fishing Problem
Father's Day Freehand
OTHER CRACKERBOX PRODUCTS USED:
A2 Card & Envelope
Cardstock 80lb.

May 6, 2023

Cat In The Hat Coffee Card

 Hello! Nadine here today with a Cat In The Hat Coffee card.


To create my card, I first stamped the Grinch Hand, and even though this is the hand of the Grinch, coloring it black and white transformed it into The Cat in the Hat hand. I then used some masking paper to mask off the fingers of the hand and then stamped the Stacked Coffee Cups. Next, I masked off the top of the cups and stamped the Fish Snooper, so he looked like he was in the top cup.
I stamped the Too Much Morning sentiment stamp. Then colored in all the images with Copic Markers and airbrushed some blue using my Copic Markers along one side of the card.

STAMPS USED:
Grinch Hand

For a full list of supplies used, click HERE
See you next time! Until then, happy crafting!

May 5, 2023

2023 Spring Summer Coffee Lovers Blog Hop

  Hello, and welcome to our blog! We are participating in the 2023 Spring/Summer Coffee Lovers Blog Hop.

What does that mean for you? Lots of inspiration and an awesome sale!
Read on for more info on the hop and how to win a $25 gift certificate to our store is listed at the bottom of this post.


Click here for all of our---> Coffee, Tea, & Cocoa Stamps


Our design team has created some cards using some of our coffee stamps to help inspire you. If you click on their name, it will take you to their blog post telling you how they created their card, or you can click on the stamp names that they used to purchase them.
Check out their beautiful cards below...


Now for what you've been waiting for, how to win!

Leave a comment on this post to be eligible to win a $25 Gift Certificate to our Crackerbox Stamps Store. Commenting will close on Friday, May 12th at 11:59 pm Pacific, and the winner will be posted here on this post on Sunday, May 14th.

For the full list of sponsors and all the companies in the hop, visit the Coffee Loving Blog post HERE to hop along for a chance to win more prizes.
The next stop on the hop is Dare 2B Artzy.

Thank you for stopping by, and happy hopping!


CONGRATS TO....
Teri Kellum, you are the lucky winner of a $25 gift code to our store. Please email us by May 27th, 2023, to claim your prize. Our email address is on the top right of our blog.

April 22, 2023

We Still Rock Birthday Card

 Hello! Nadine here today with a birthday card using some stamps from the Remember the 60s category in the store.

Using a piece of 80lb. White Cardstock, I stamped the We Still Rock sentiment with VersaFine Clair in Nocturne and added some pink embossing powder just to the "We still rock!" part of the stamp and heat set it with a heat tool. Then just below the sentiment, I stamped the Girls Boombox and colored it with a pink and grey Copic Marker. On my card front, I used some patterned papers I had in my stash.

CRACKERBOX STAMPS PRODUCTS USED:
80lb. White Cardstock
We Still Rock
Girls Boombox

For a full list of supplies used, click HERE
See you next time! Until then, happy crafting!

April 15, 2023

Graduation Card

 Hello! Nadine here today with a flag banner shaped graduation card. The card can be customized to whatever the graduate's school colors are. The school colors for the card I made are blue and gold, so that is what I used.

I used a flag banner shaped die with navy blue cardstock folded in half to create the card base. I left the top edge of the die hanging over the folded area of the card so it did not cut there and left a hinge for the card to open. I then die-cut out some smaller flag banners, one in gold foiled paper and two in white cardstock. I stamped the Your Future Is Golden sentiment on one of the white pieces. I stamped the Graduation Cap and Diploma Scroll on some scrap pieces of white cardstock, colored them in with Copic Markers, and fussy cut them out. I used some glitter markers to color the tassel on the cap and ribbon in the scroll and then flicked some of the glitter ink onto the front of the card front with the sentiment on it. Matted the card front with gold paper, adhered it to the navy blue card base, and added some confetti sequins.

I adhered the other white flag banner I cut out to the inside of the card and stamped the Congratulations Snarky sentiment on it. My card fits perfectly into an A2 size envelope.

CRACKERBOX PRODUCTS USED:
Your Future Is Golden
Graduation Cap
Diploma Scroll
Congratulations Snarky
80 lb. White Cardstock
A2 Envelopes

For a full list of supplies used, click HERE

See you next time! Until then, happy crafting!

April 11, 2023

Who Walks Beside You Card

 Hello! Nadine here, and today I am sharing a beautiful who walks beside you inspirational card.

I first stamped the Apple Blossom stamp using VersaMark on black cardstock and then heat embossed it with rose gold embossing powder. I repeated the same thing with the It Doesn't Matter sentiment stamp.
Then I colored the Apple Blossom stamp with colored pencils and added some crystal drops.
The flower stamp I used is just one of the newly released flower stamps that Alex drew. Alex lives in Ukraine, and all this month, to help support him, all profits from his flower stamps will be donated to him. You can see all of his flower stamps HERE.

STAMPS USED:
Apple Blossom
It Doesn't Matter
All New Flower Stamps

For a full list of supplies used, click HERE

See you next time! Until then, happy crafting!

April 6, 2023

The Older I Get Masculine Golf Card

 Hello! Nadine here, and today I am sharing a humorous masculine golf card that can be sent as a birthday card.

I used several Crackerbox Stamps on my card. I first stamped the Golf Swing Guy and colored him in with Copic Markers. Then I stamped the Golf Swing guy on some masking paper, fussy cut it out, and placed it over the colored image on the front of my card. Then I stamped the Grass along the bottom using some green ink and the Golf Ball and Tee. Next, I stamped the Golf Green and the Older I Get sentiment. I then used my Copic Markers and airbrush machine on the background of my card to color in the Golf Green and around it.

STAMPS USED:
Older I Get
Golf Swing Guy 
Grass
Golf Ball and Tee
Golf Green
For a full list of supplies used, click HERE.

See you next time! Until then, happy crafting!

March 22, 2023

Simple Favorite Peep Easter Spring Card

 Hello! Nadine here, and today I am sharing a simple favorite peep Easter Spring card.


I started by creating the grass on the bottom of my card using a piece of mask tape and then using an ink blending brush to blend some green ink. Then using the little flowers from the Daisy Heart Flower Set, I stamped the flowers with the same color ink randomly over the ink blended area.


Next, I removed the mask tape and stamped the Chicks and the Favorite Peep. Then colored the chicks with a yellow Copic Marker, matted my card front with yellow cardstock, and adhered it to my card base. Easy Peasy!
NOTE: When I removed the mask tape, I accidentally got some ink on my finger and then touched the white part of my card, leaving a fingerprint. Luckily I did not have to start all over. Instead, I used my Ink Eraser and erased it. Phew, I was saved!

STAMPS USED:
For a full list of supplies used, click HERE.

See you next time! Until then, happy crafting!

March 6, 2023

You're My Favorite Peep Easter Card

 Hello! Nadine here today with a cute Easter Card.


I stamped the Peep Bunny 3 different times and colored them by airbrushing them with Copic Markers. I stamped the Eggs Decorated and colored them with Copic Markers. Then I fussy cut the Peeps & Eggs out. I stamped the Favorite Peep stamp for the sentiment and used a die cut to cut it out. For the grass, I cut into some green cardstock creating a bunch of thin strips, but the part I tucked under the sentiment I did not cut, so they were all still attached.